> ## Documentation Index
> Fetch the complete documentation index at: https://docs.vizcom.com/llms.txt
> Use this file to discover all available pages before exploring further.
# Connect Vizcom to Autodesk Fusion
> Move your 3D models between Vizcom and Autodesk Fusion — in both directions, at any stage of your creative process.
## When to use the Autodesk Plugin
Designers who want to connect their Vizcom workflow to Autodesk Fusion. Whether you're pushing a 3D model into Fusion for engineering and production, or bringing a Fusion design back into Vizcom to keep iterating — this integration keeps your creative vision intact the whole way through.
## How to use the Autodesk Plugin
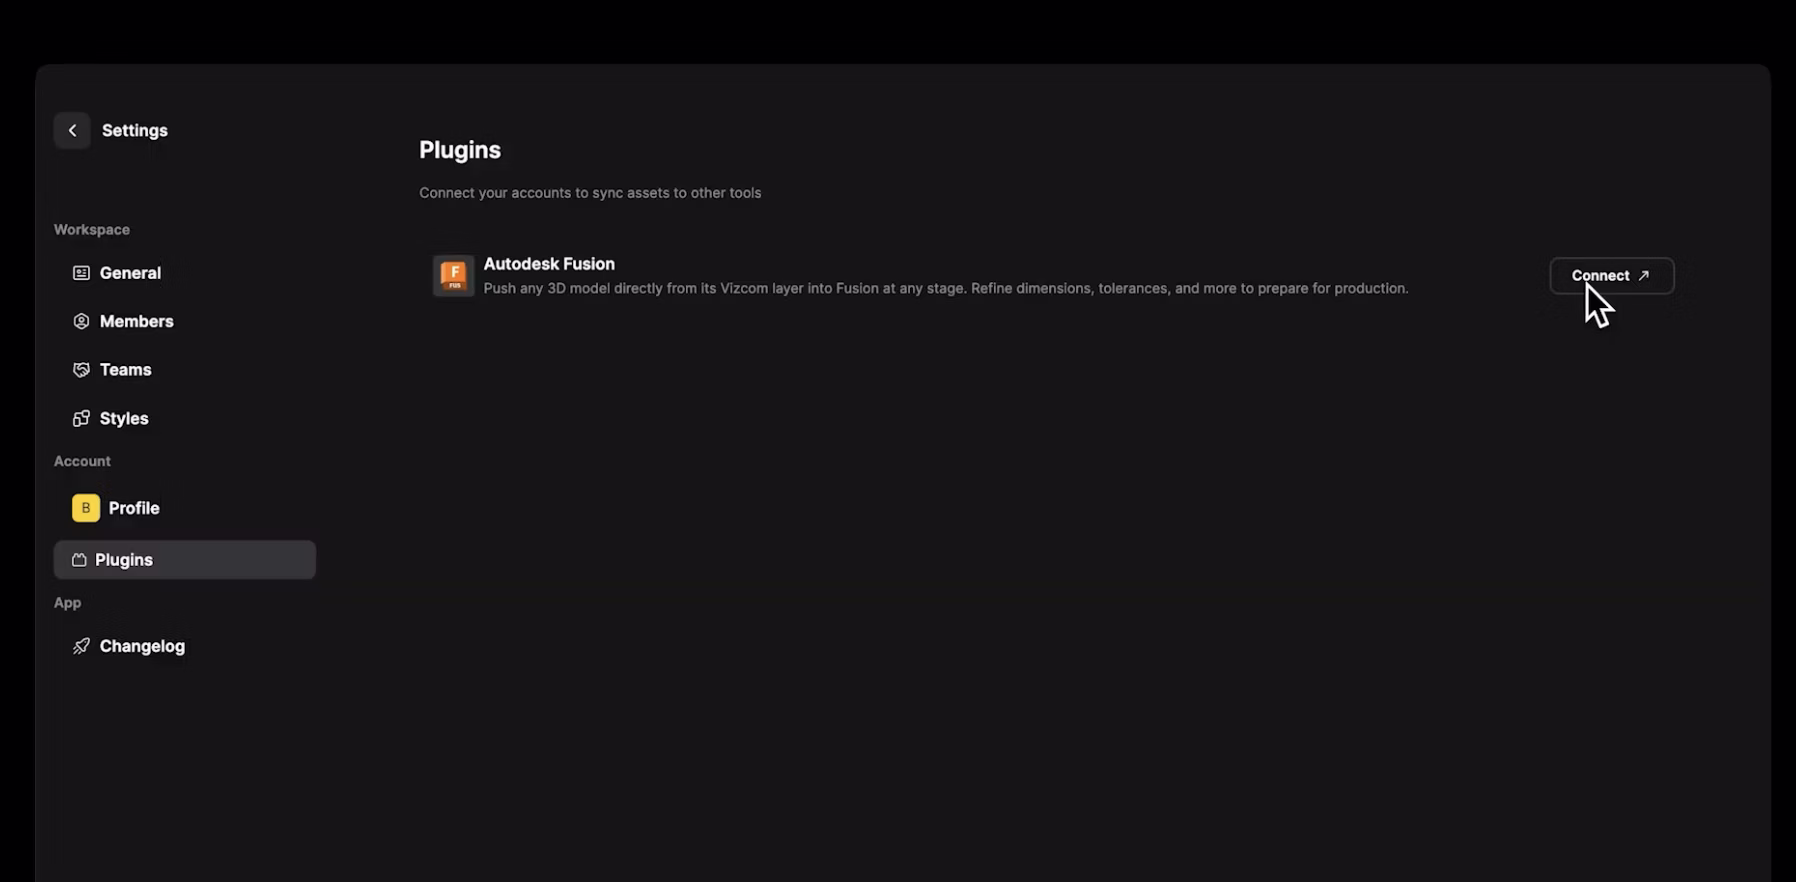
### Step 1 — Connect Your Accounts
Before you can export in either direction, connect your Autodesk account to Vizcom.
1. Go to **Settings → Plugins** in your Vizcom workspace and find the **Autodesk Fusion** plugin card and click **Connect**
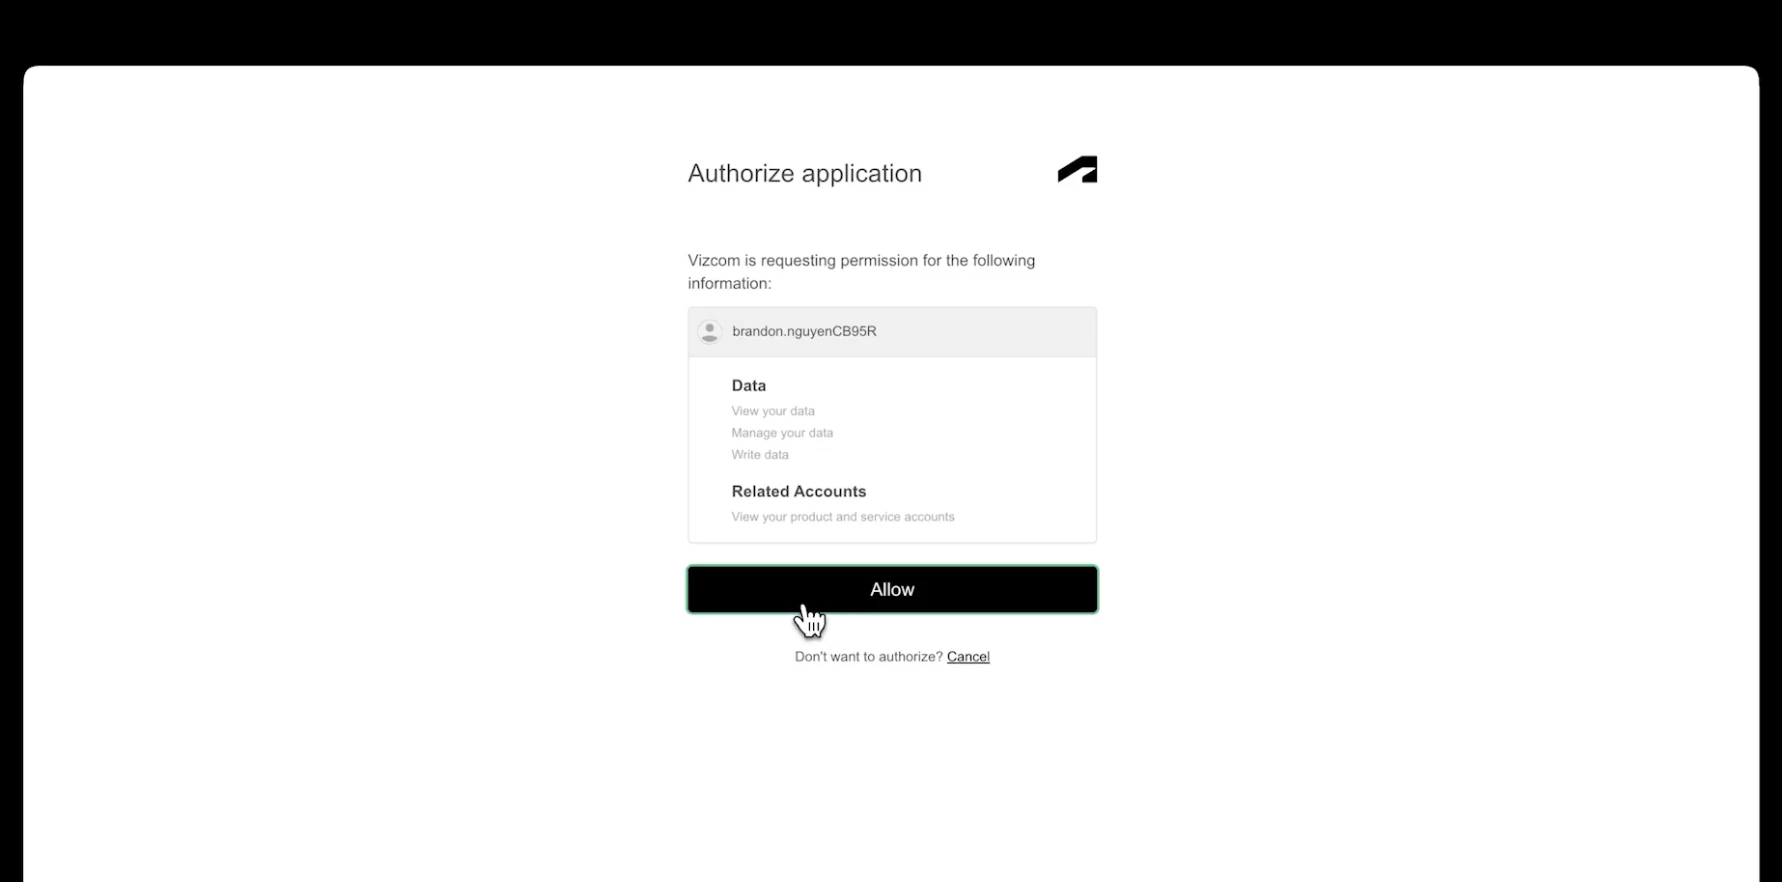
 2. A new browser tab will open — log in with your Autodesk credentials
3. Click **Allow** to authorize Fusion to connect to Vizcom
2. A new browser tab will open — log in with your Autodesk credentials
3. Click **Allow** to authorize Fusion to connect to Vizcom
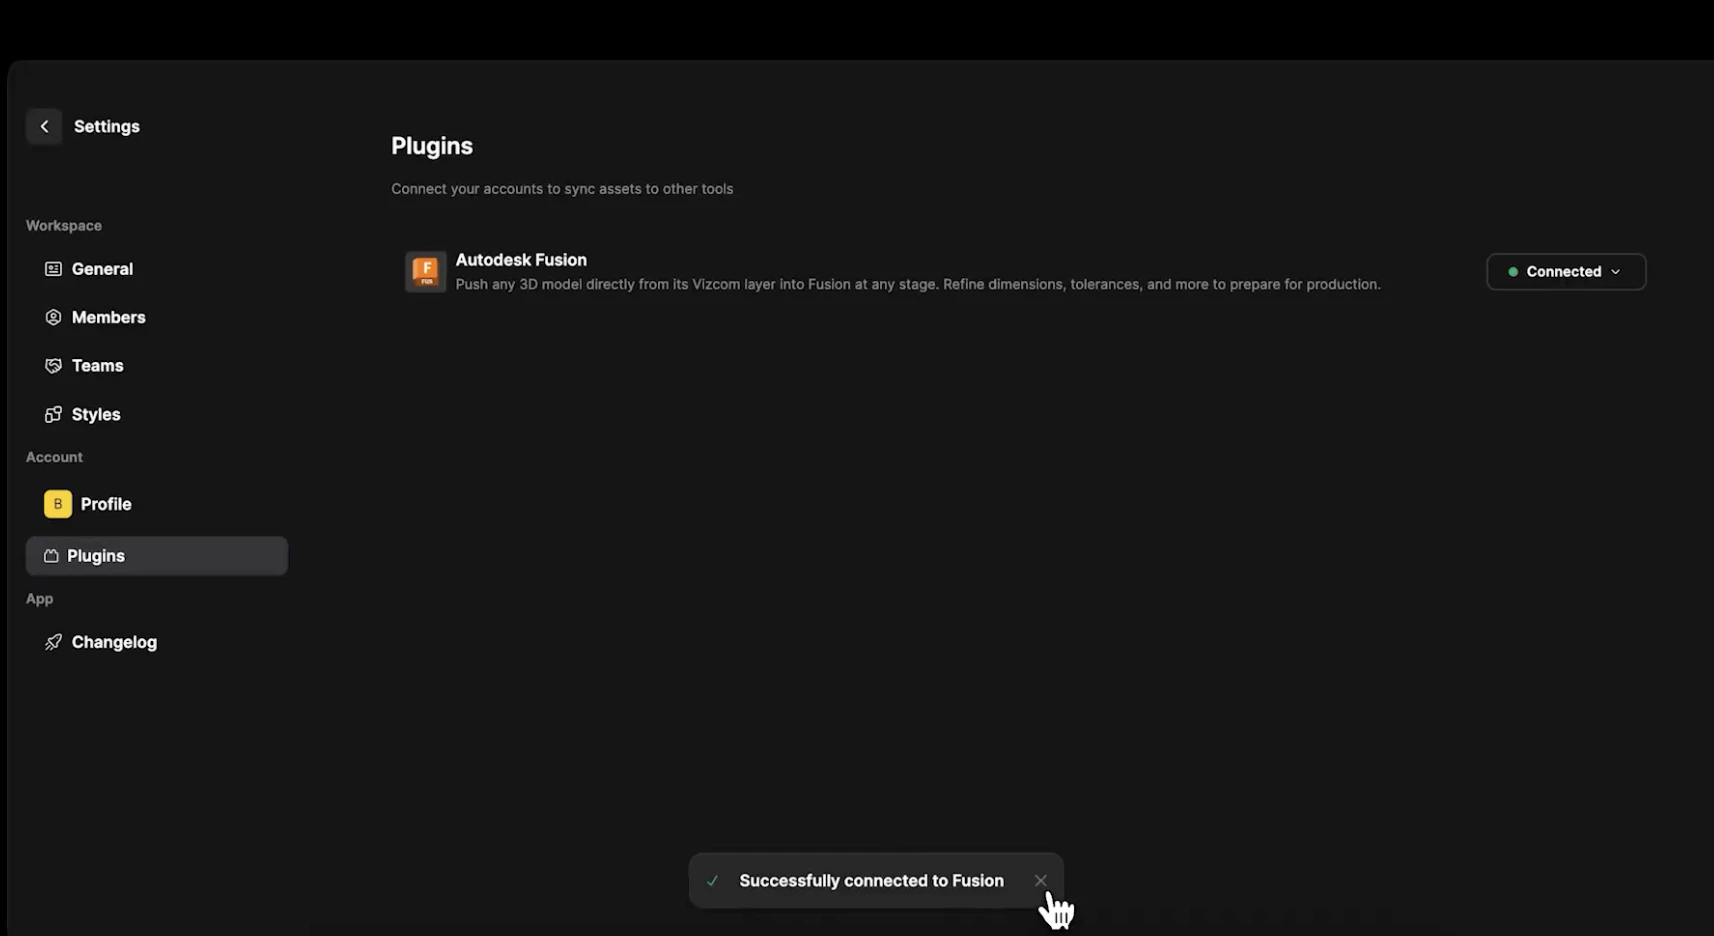
 4. You'll be returned to Vizcom — you're now connected
 ## Step 2A — Export from Vizcom to Fusion
1. Open your workbench and locate the 3D model you want to export
2. Right-click the **3D layer** in the layers panel and select **Export to Autodesk Fusion**
## Step 2A — Export from Vizcom to Fusion
1. Open your workbench and locate the 3D model you want to export
2. Right-click the **3D layer** in the layers panel and select **Export to Autodesk Fusion**
 3. Vizcom will fetch your Fusion hub — select a **destination hub** and **project**
4. Click **Export**
You can continue working while the export runs. You'll be notified when it's complete.
Use this flow when you're ready to take your concept into engineering — no rebuilding from scratch, no lost fidelity.
* Your model is converted to an **OBJ file** and sent directly to your selected Fusion hub and project
* You can only export **3D layers** — this option will not appear on image or background layers
* The Export to Autodesk Fusion option is only available from the **layers panel in the 2D Studio**
## Step 2B — Export from Fusion to Vizcom
**Definitions:**
1. **Hubs:** in Fusion, these act like workspaces in Vizcom
2. **Projects:** in Fusion, these act like teams in Vizcom
3. **Design:** this is an interactive 3D model in Fusion. This is a bespoke Fusion file format called .f3d. These live in Projects
4. **Add-in:** this is what I am going to refer to the Vizcom app within Fusion as. This is their language.
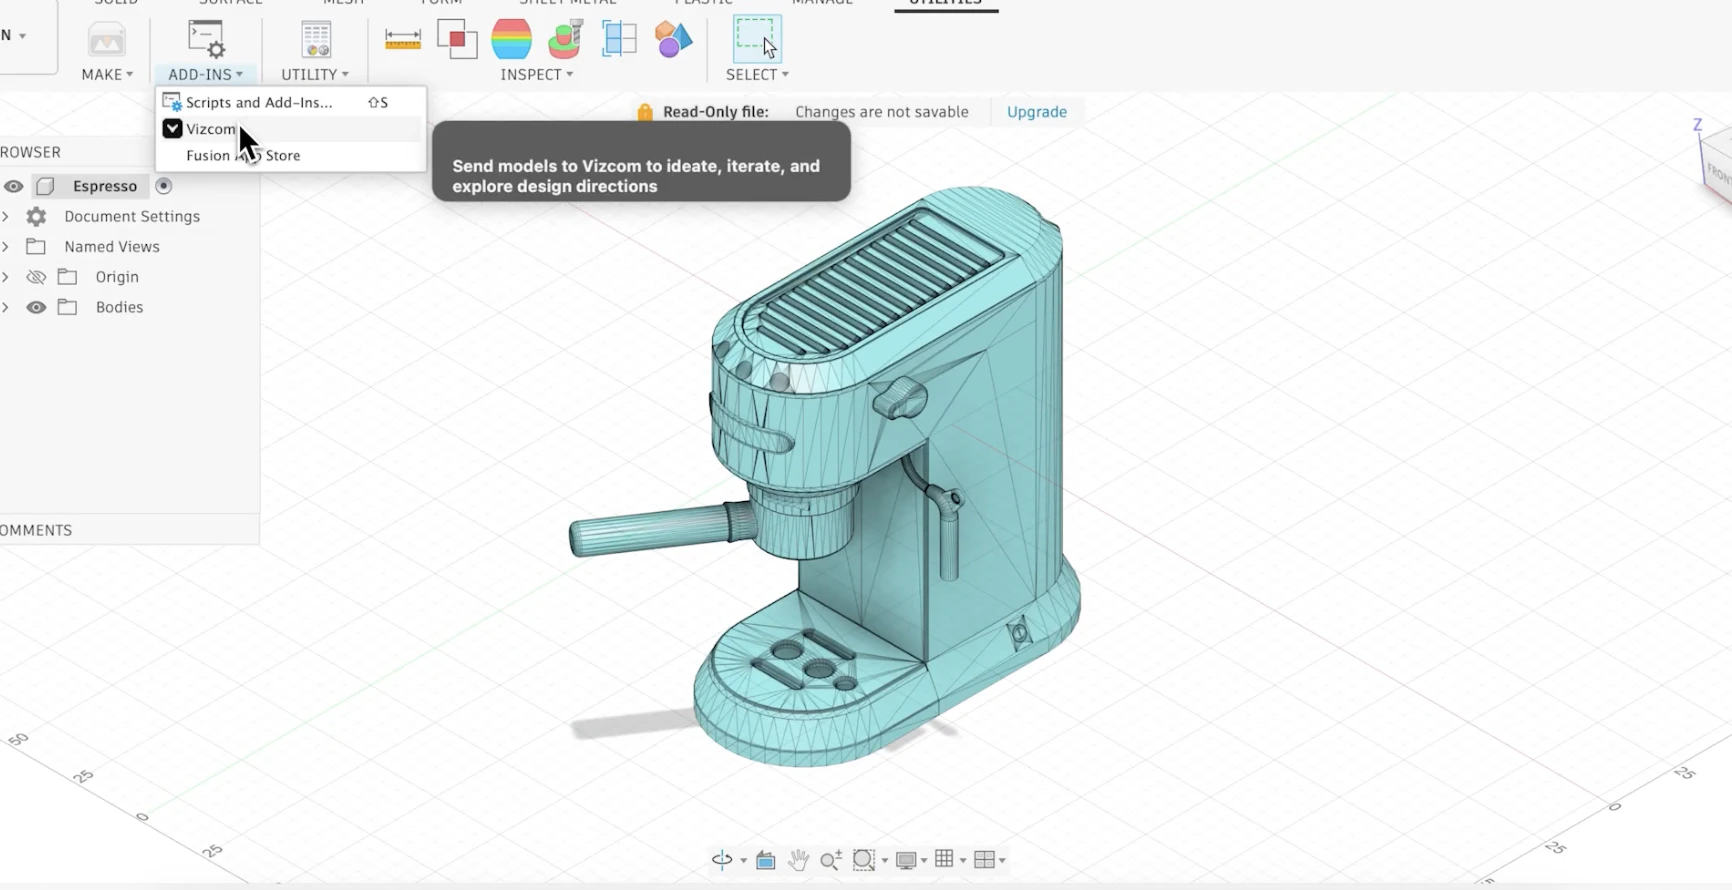
1. Open Autodesk Fusion and click the **Vizcom add-in** from the Add-Ins toolbar
3. Vizcom will fetch your Fusion hub — select a **destination hub** and **project**
4. Click **Export**
You can continue working while the export runs. You'll be notified when it's complete.
Use this flow when you're ready to take your concept into engineering — no rebuilding from scratch, no lost fidelity.
* Your model is converted to an **OBJ file** and sent directly to your selected Fusion hub and project
* You can only export **3D layers** — this option will not appear on image or background layers
* The Export to Autodesk Fusion option is only available from the **layers panel in the 2D Studio**
## Step 2B — Export from Fusion to Vizcom
**Definitions:**
1. **Hubs:** in Fusion, these act like workspaces in Vizcom
2. **Projects:** in Fusion, these act like teams in Vizcom
3. **Design:** this is an interactive 3D model in Fusion. This is a bespoke Fusion file format called .f3d. These live in Projects
4. **Add-in:** this is what I am going to refer to the Vizcom app within Fusion as. This is their language.
1. Open Autodesk Fusion and click the **Vizcom add-in** from the Add-Ins toolbar
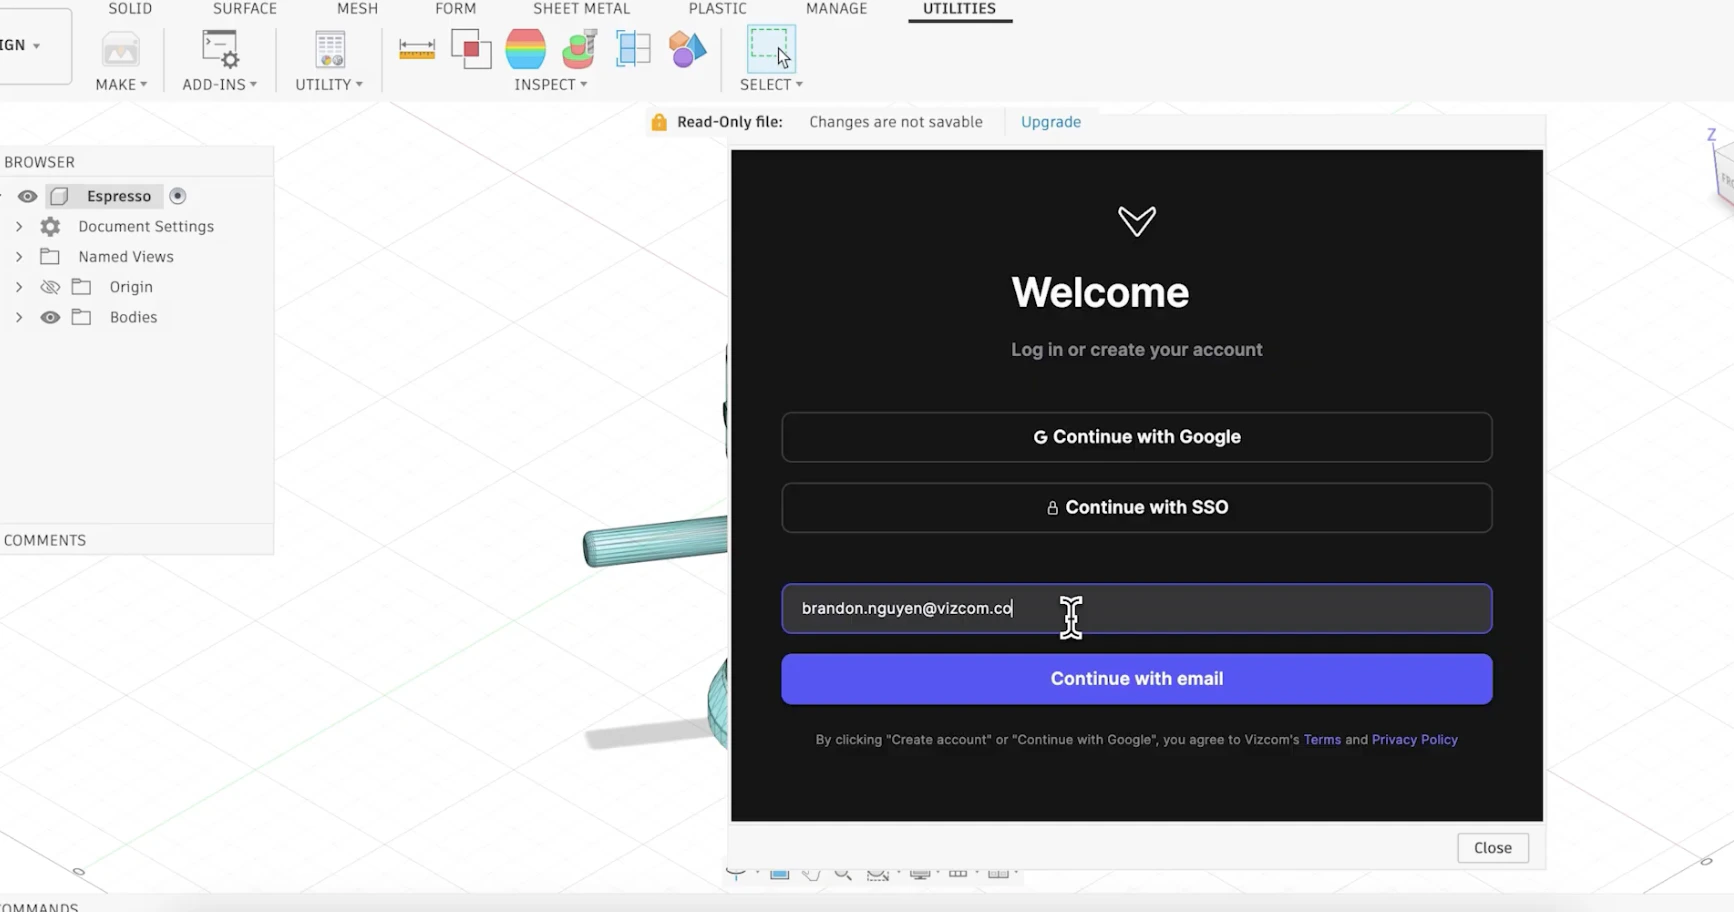
 2. Log in to your Vizcom account through the add-in
 3. Select your **Vizcom workspace** and the **drawing** you want to export to
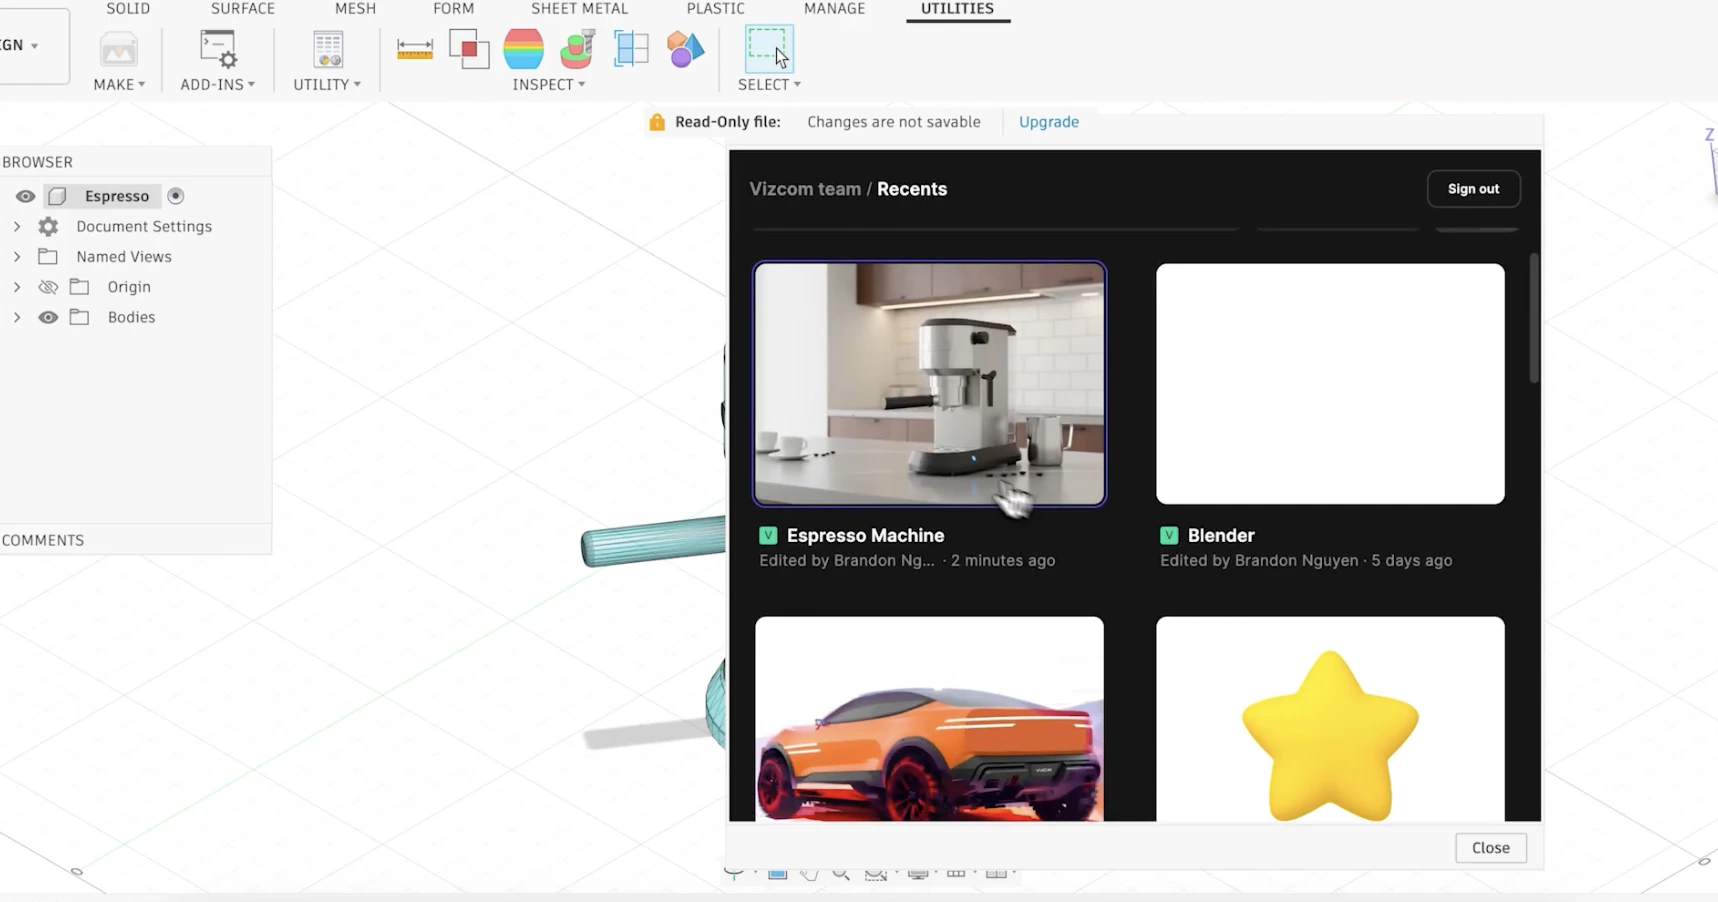 4. Select the **design** you want to bring into Vizcom and click **OK**
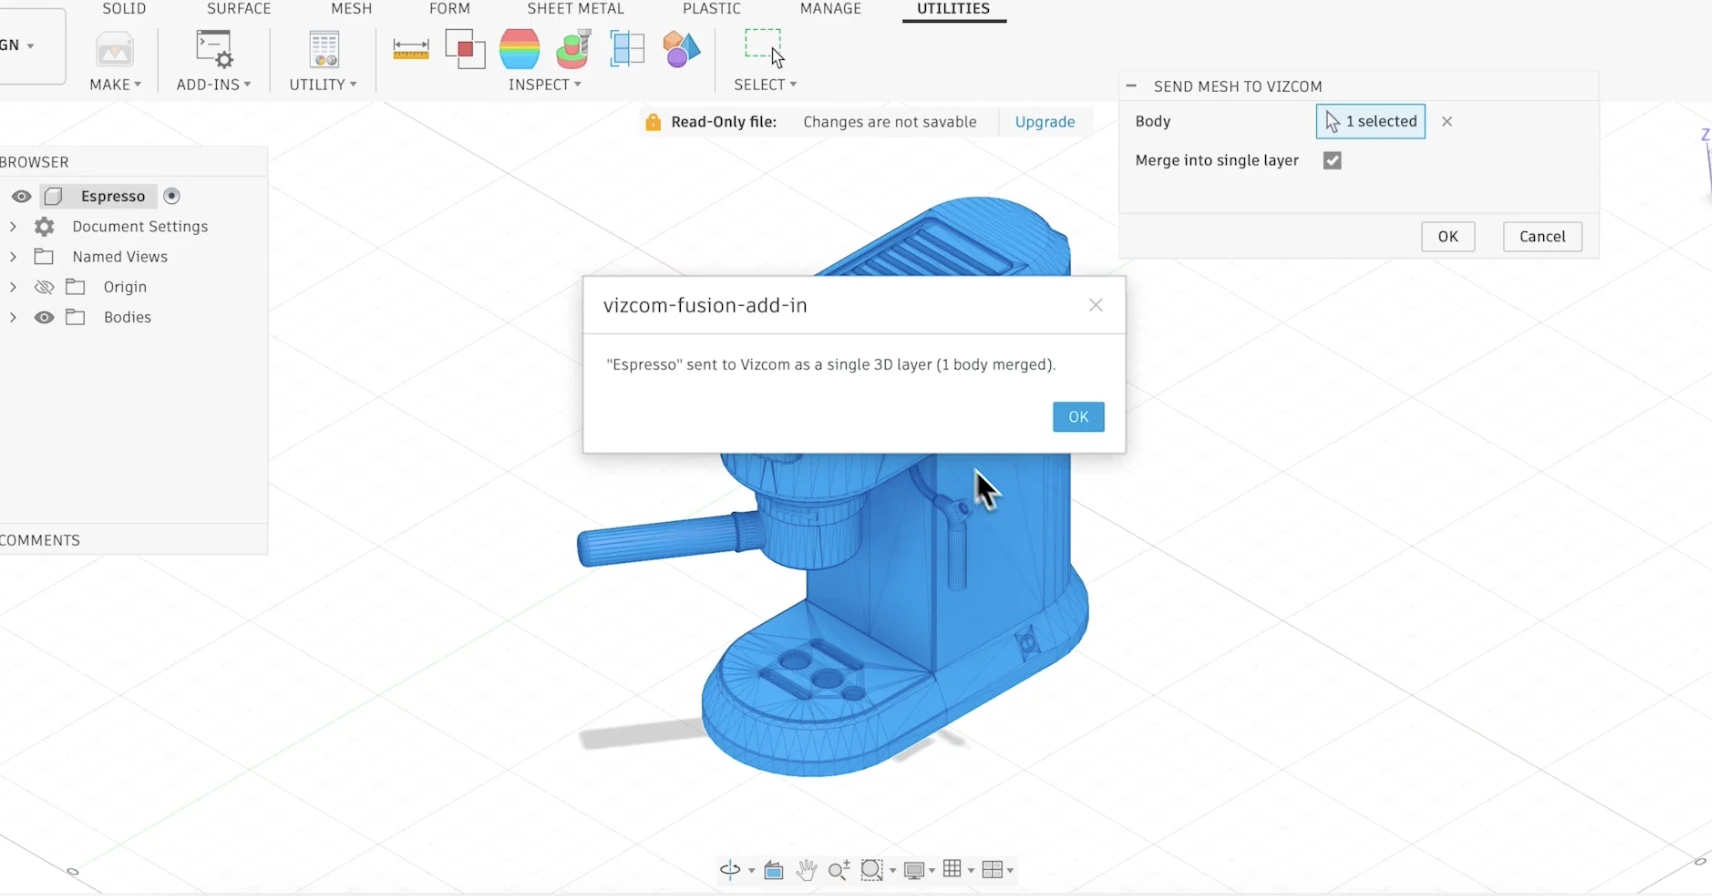
 5. Wait for confirmation that your design has been sent to Vizcom
 Your Fusion design will be exported directly to the selected layer in Vizcom.
Use this flow when you want to explore new design directions on an existing Fusion model — bring it into Vizcom to iterate, then send it back when you're ready.
* Make sure the **Vizcom drawing you're exporting to is open** in Vizcom — this is the easiest way to find it after export
* If the drawing isn't open, navigate to your workbench to locate it manually
* Set your workbench to **thumbnail view** and make sure the file name is up to date for easy navigation
## Next Steps
See the full Vizcom to Fusion workflow in action
Connect your Autodesk account and get started
Having trouble? Reach out at [support@vizcom.](mailto:support@vizcom.ai)com or find us on [Discord](#).
***
Your Fusion design will be exported directly to the selected layer in Vizcom.
Use this flow when you want to explore new design directions on an existing Fusion model — bring it into Vizcom to iterate, then send it back when you're ready.
* Make sure the **Vizcom drawing you're exporting to is open** in Vizcom — this is the easiest way to find it after export
* If the drawing isn't open, navigate to your workbench to locate it manually
* Set your workbench to **thumbnail view** and make sure the file name is up to date for easy navigation
## Next Steps
See the full Vizcom to Fusion workflow in action
Connect your Autodesk account and get started
Having trouble? Reach out at [support@vizcom.](mailto:support@vizcom.ai)com or find us on [Discord](#).
***