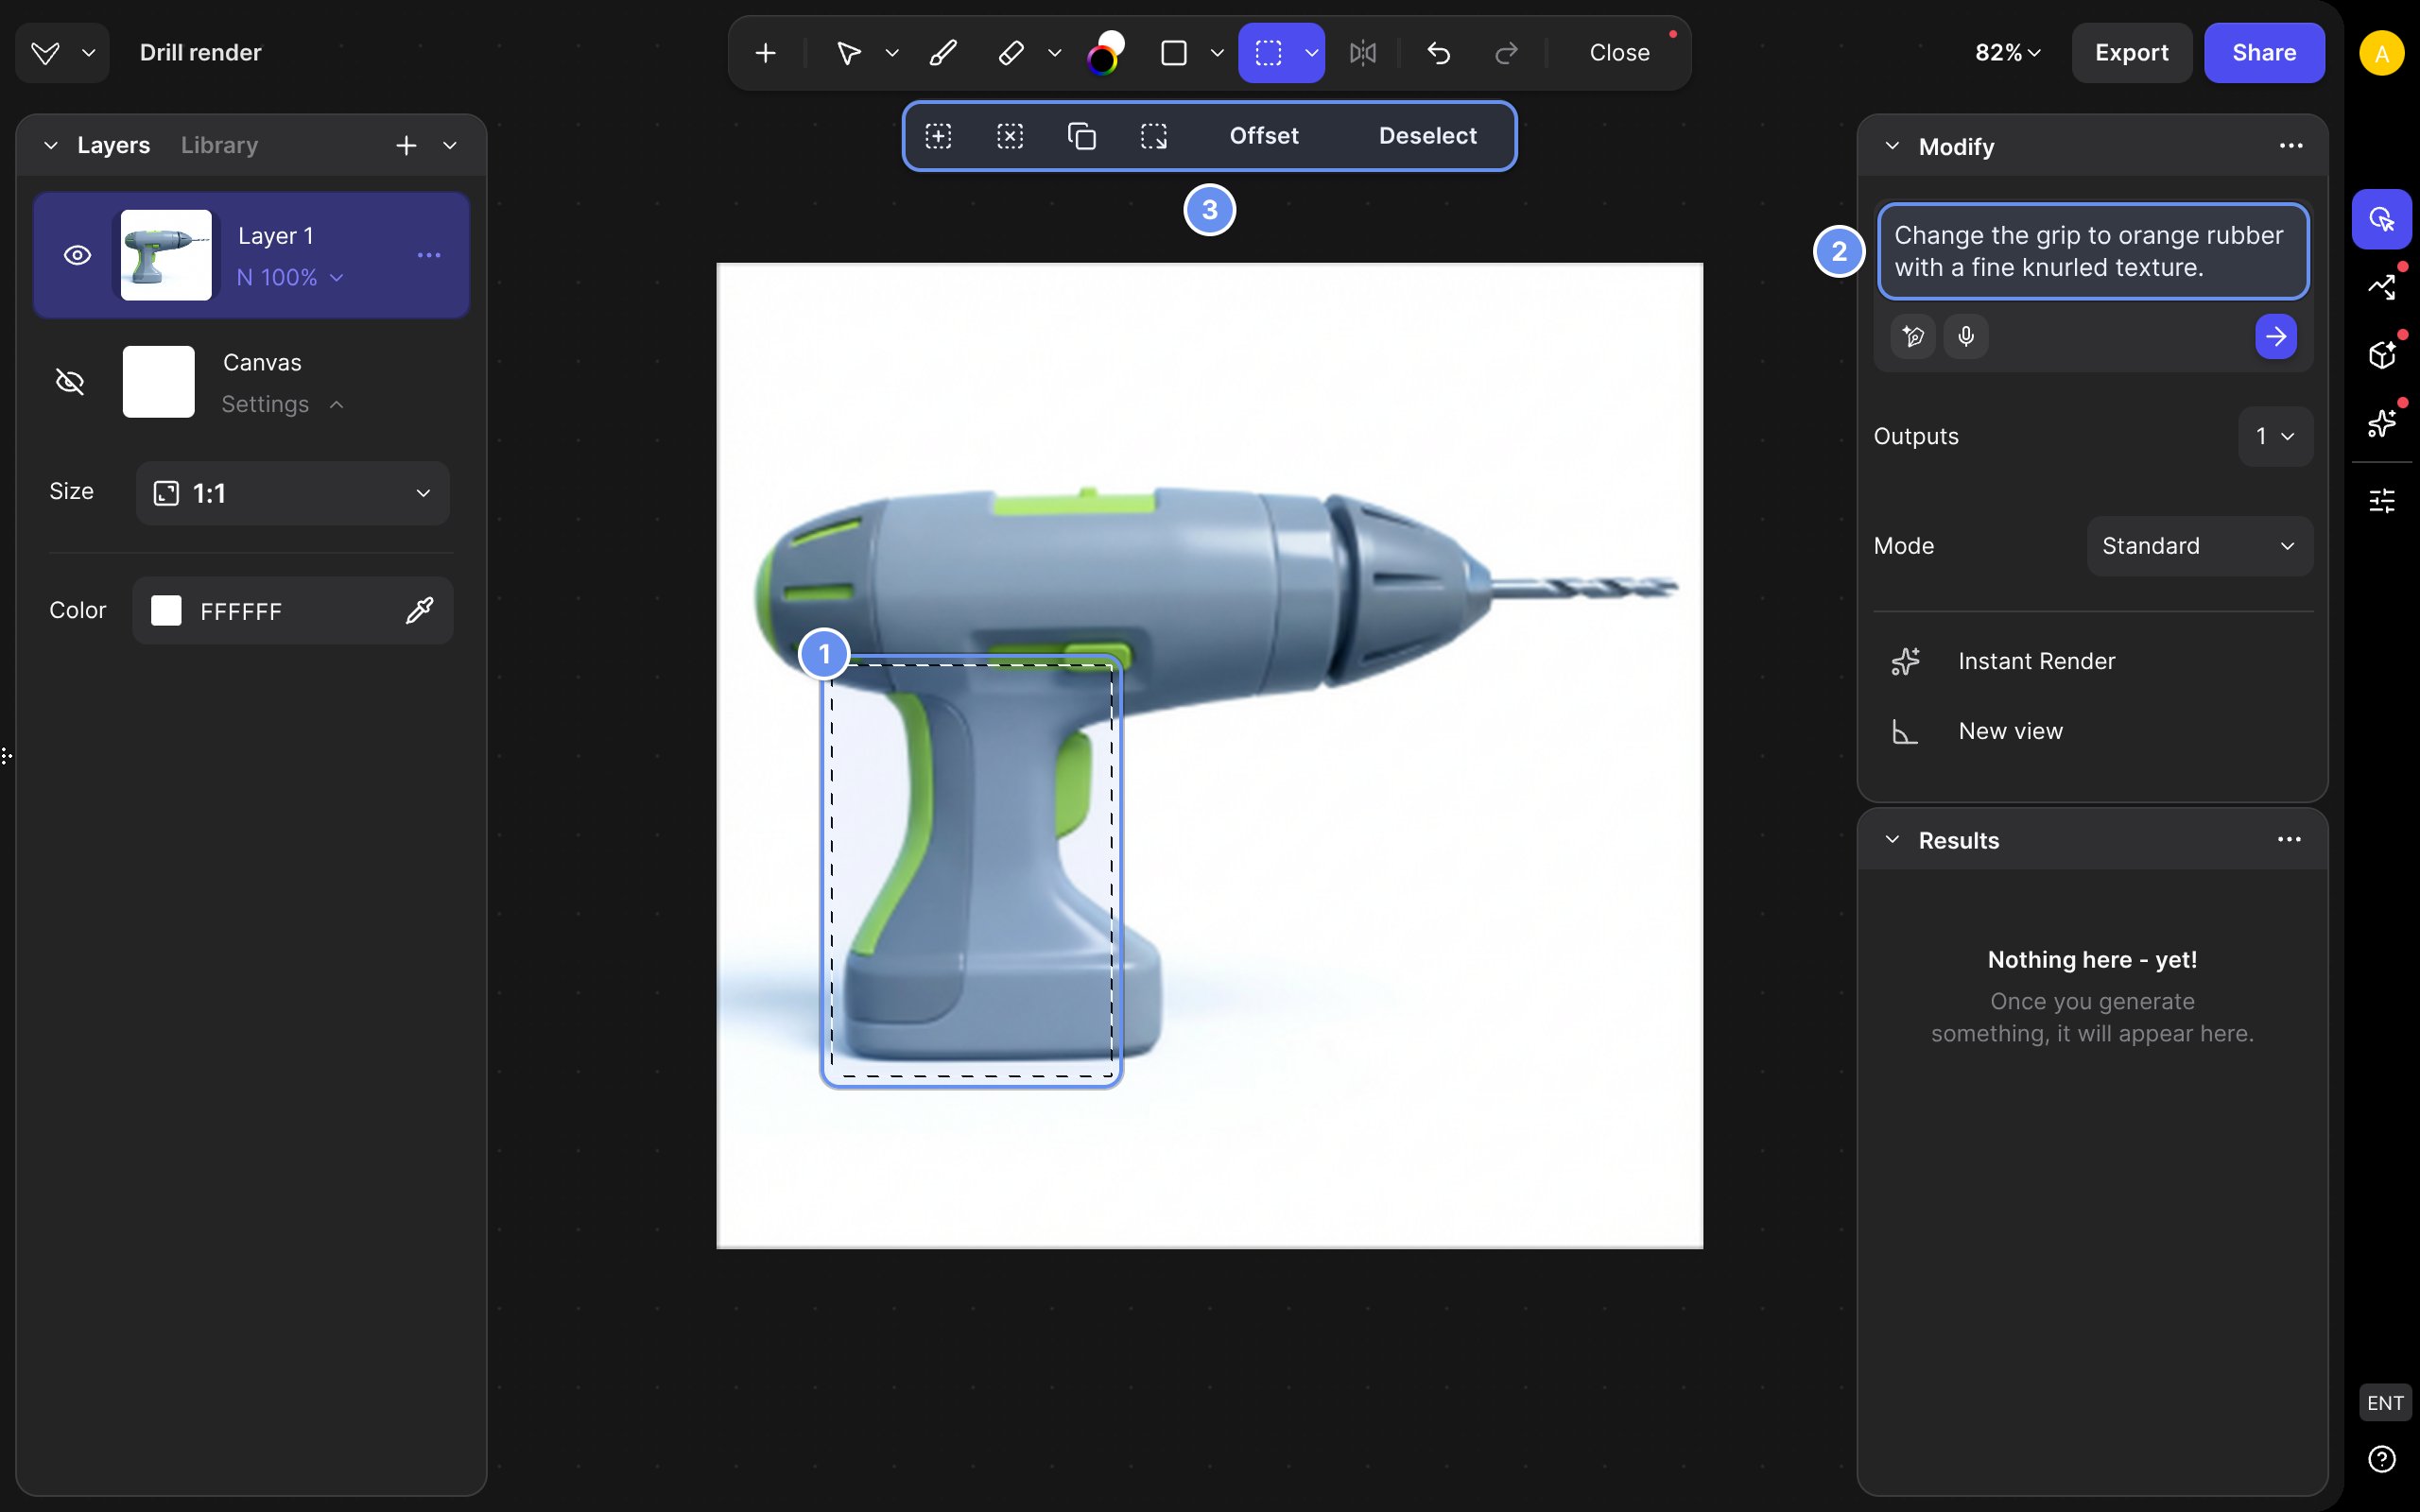
{"docsConfig":{"theme":"luma","$schema":"https://mintlify.com/docs.json","name":"Vizcom Docs","description":"Guides for designers and teams using Vizcom, the AI design tool for sketching, rendering, and refining product concepts in 2D and 3D, plus help with workspaces, billing, and Enterprise administration.","colors":{"primary":"#6790EF","light":"#D1DFFF","dark":"#1145A0"},"logo":{"light":"https://mintcdn.com/vizcom-c4034e9b/l3hebjVqvRBa2E6g/images/logo-dark.svg?fit=max\u0026auto=format\u0026n=l3hebjVqvRBa2E6g\u0026q=85\u0026s=22515442b3097b2a6ffbf4ede9f56565","dark":"https://mintcdn.com/vizcom-c4034e9b/l3hebjVqvRBa2E6g/images/logo-light.svg?fit=max\u0026auto=format\u0026n=l3hebjVqvRBa2E6g\u0026q=85\u0026s=7112255f58c36c98724271cccda31036","href":"https://vizcom.com/"},"favicon":"https://mintcdn.com/vizcom-c4034e9b/mZT69WTP9Dk-4r_B/images/favicon.svg?fit=max\u0026auto=format\u0026n=mZT69WTP9Dk-4r_B\u0026q=85\u0026s=e7ab289d62821f9faec0f9fb2361cbf1","appearance":{"default":"system"},"background":{"decoration":"grid","color":{"light":"#F8F4F1","dark":"#191919"}},"navbar":{"links":[{"href":"https://app.vizcom.com/auth?utm_source=docs\u0026utm_medium=web\u0026utm_campaign=docs\u0026utm_content=cta_login","label":"Log in"}],"primary":{"type":"button","label":"Sign up","href":"https://app.vizcom.com/auth?utm_source=docs\u0026utm_medium=web\u0026utm_campaign=docs\u0026utm_content=cta_signup"}},"footer":{"socials":{"x":"https://x.com/Vizcom_","linkedin":"https://www.linkedin.com/company/vizcomhq","instagram":"https://www.instagram.com/vizcom_","youtube":"https://www.youtube.com/channel/UCU-XOa74z1aGdZRyvRBQ6UQ","discord":"https://discord.gg/aJZZaJpPSZ"}},"search":{"prompt":"Search or ask, e.g. “how do I change only the sole?”"},"fonts":{"family":"Matter","weight":400,"source":"https://cdn.prod.website-files.com/68da69e18c8988d039a9f6fe/6903b8705cce60bc3d9e254b_Matter-Regular.woff2","format":"woff2"},"icons":{"library":"fontawesome"},"styling":{"eyebrows":"breadcrumbs","codeblocks":"system","latex":false},"contextual":{"options":["copy","view","chatgpt","claude","perplexity","mcp","cursor","vscode"],"display":"header"},"thumbnails":{"fonts":{"family":"Matter"}},"navigation":{"pages":[]}},"deployment":{"deploymentMetadataValue":{"subdomain":"vizcom-c4034e9b","hasAudioNarration":false,"actualSubdomain":"vizcom-c4034e9b","customDomains":["docs.vizcom.com"],"gitSource":{"type":"github","owner":"vizcomtech","repo":"docs","deployBranch":"main","contentDirectory":"","isPrivate":true,"mountPath":"","label":"","_id":"6af36121a0f7f7caf9703cf7"},"feedback":{"thumbs":true},"entitlements":{"AI_CHAT":{"status":"ENABLED"},"REMOVE_BRANDING":{"status":"DISABLED"},"CONTEXTUAL_FEEDBACK":{"status":"DISABLED"},"CODE_SNIPPET_FEEDBACK":{"status":"DISABLED"},"WEB_MCP":{"status":"ENABLED"},"NARRATION":{"status":"ENABLED"}},"buildId":"6af36727140d38558d245dcf","clientVersion":"0.0.4094","searchFilterCounts":[{"language":"default","tag":"Tools","count":33},{"language":"default","tag":"Guides","count":20},{"language":"default","tag":"Workflows","count":18},{"language":"default","tag":"Admin \u0026 security","count":13},{"language":"default","tag":"Explore","count":11},{"language":"default","tag":"Help","count":10},{"language":"default","tag":"Reference","count":9},{"language":"default","tag":"Render","count":8},{"language":"default","tag":"By industry","count":8},{"language":"default","tag":"By deliverable","count":8}]},"assistantConfig":{"enableAskAiButton":false,"enableStarterQuestions":true,"enableAskAiSearchBar":true,"deflection":{"enabled":true,"email":"[email protected]"}},"basePath":"","hasChatPermissions":true,"hasWebMcpPermissions":true,"toggles":[{"name":"kill-isr","enabled":true,"variant":{"name":"disabled","enabled":false,"feature_enabled":true},"impressionData":false},{"name":"custom-rbac-roles","enabled":true,"variant":{"name":"disabled","enabled":false,"feature_enabled":true},"impressionData":false},{"name":"agent-mintlify-slack","enabled":true,"variant":{"name":"disabled","enabled":false,"feature_enabled":true},"impressionData":false},{"name":"agent-integrations-settings","enabled":true,"variant":{"name":"disabled","enabled":false,"feature_enabled":true},"impressionData":false},{"name":"rbac-expansion","enabled":true,"variant":{"name":"disabled","enabled":false,"feature_enabled":true},"impressionData":false},{"name":"automations-pr-grouping","enabled":true,"variant":{"name":"disabled","enabled":false,"feature_enabled":true},"impressionData":false},{"name":"custom-prefix","enabled":true,"variant":{"name":"disabled","enabled":false,"feature_enabled":true},"impressionData":false},{"name":"analytics-v7","enabled":true,"variant":{"name":"disabled","enabled":false,"feature_enabled":true},"impressionData":false},{"name":"user-flows-analytics","enabled":true,"variant":{"name":"disabled","enabled":false,"feature_enabled":true},"impressionData":false},{"name":"no-publish-flow","enabled":true,"variant":{"name":"disabled","enabled":false,"feature_enabled":true},"impressionData":false},{"name":"workos-onboarding","enabled":true,"variant":{"name":"disabled","enabled":false,"feature_enabled":true},"impressionData":false},{"name":"llms-txt-v2","enabled":true,"variant":{"name":"disabled","enabled":false,"feature_enabled":true},"impressionData":false},{"name":"snapshot-serving-live","enabled":true,"variant":{"name":"disabled","enabled":false,"feature_enabled":true},"impressionData":false},{"name":"stripTemperatureMiddleware","enabled":true,"variant":{"name":"disabled","enabled":false,"feature_enabled":true},"impressionData":false},{"name":"support-platform-pylon-zendesk","enabled":true,"variant":{"name":"disabled","enabled":false,"feature_enabled":true},"impressionData":false},{"name":"snapshot-serving","enabled":true,"variant":{"name":"disabled","enabled":false,"feature_enabled":true},"impressionData":false},{"name":"instant-rollback","enabled":true,"variant":{"name":"disabled","enabled":false,"feature_enabled":true},"impressionData":false},{"name":"granular-notifications-server","enabled":true,"variant":{"name":"disabled","enabled":false,"feature_enabled":true},"impressionData":false},{"name":"granular-notifications","enabled":true,"variant":{"name":"disabled","enabled":false,"feature_enabled":true},"impressionData":false},{"name":"automations-fable","enabled":true,"variant":{"name":"disabled","enabled":false,"feature_enabled":true},"impressionData":false},{"name":"fixed-ai-action-pricing","enabled":true,"variant":{"name":"disabled","enabled":false,"feature_enabled":true},"impressionData":false},{"name":"automation-resolve-merge-conflict","enabled":true,"variant":{"name":"disabled","enabled":false,"feature_enabled":true},"impressionData":false},{"name":"scoped-publishing","enabled":true,"variant":{"name":"disabled","enabled":false,"feature_enabled":true},"impressionData":false},{"name":"mintql","enabled":true,"variant":{"name":"disabled","enabled":false,"feature_enabled":true},"impressionData":false},{"name":"page-level-analytics","enabled":true,"variant":{"name":"disabled","enabled":false,"feature_enabled":true},"impressionData":false},{"name":"editor-version-history-v2","enabled":true,"variant":{"name":"disabled","enabled":false,"feature_enabled":true},"impressionData":false},{"name":"billing-page-v2","enabled":true,"variant":{"name":"disabled","enabled":false,"feature_enabled":true},"impressionData":false},{"name":"full-page-search","enabled":true,"variant":{"name":"disabled","enabled":false,"feature_enabled":true},"impressionData":false},{"name":"workspace-projects","enabled":true,"variant":{"name":"disabled","enabled":false,"feature_enabled":true},"impressionData":false},{"name":"assistant-v5","enabled":true,"variant":{"name":"disabled","enabled":false,"feature_enabled":true},"impressionData":false},{"name":"fork-pr-previews","enabled":true,"variant":{"name":"disabled","enabled":false,"feature_enabled":true},"impressionData":false},{"name":"revalidation-jwt","enabled":true,"variant":{"name":"disabled","enabled":false,"feature_enabled":true},"impressionData":false},{"name":"workos-sso-scim","enabled":true,"variant":{"name":"disabled","enabled":false,"feature_enabled":true},"impressionData":false},{"name":"hobby-abuse-scan","enabled":true,"variant":{"name":"disabled","enabled":false,"feature_enabled":true},"impressionData":false},{"name":"dashboard-inbox","enabled":true,"variant":{"name":"disabled","enabled":false,"feature_enabled":true},"impressionData":false},{"name":"workos-signup","enabled":true,"variant":{"name":"disabled","enabled":false,"feature_enabled":true},"impressionData":false},{"name":"turbopuffer-dual-write","enabled":true,"variant":{"name":"disabled","enabled":false,"feature_enabled":true},"impressionData":false},{"name":"workos-enabled","enabled":true,"variant":{"name":"disabled","enabled":false,"feature_enabled":true},"impressionData":false},{"name":"approve-review-flow","enabled":true,"variant":{"name":"disabled","enabled":false,"feature_enabled":true},"impressionData":false},{"name":"editor-metadata","enabled":true,"variant":{"name":"disabled","enabled":false,"feature_enabled":true},"impressionData":false},{"name":"sso-setup-deadline-banner","enabled":true,"variant":{"name":"disabled","enabled":false,"feature_enabled":true},"impressionData":false},{"name":"turbopuffer-serve","enabled":true,"variant":{"name":"disabled","enabled":false,"feature_enabled":true},"impressionData":false},{"name":"live-agents","enabled":true,"variant":{"name":"disabled","enabled":false,"feature_enabled":true},"impressionData":false}],"starterQuestions":[{"_id":"6abace65b0dc5fbdf2920419","deploymentId":"697a7cfa899b175f71812b73","questionText":"How do Vizcom credits work?","status":"active","generatedBy":"manual","createdAt":"2026-09-28T20:30:29.573Z","updatedAt":"2026-09-28T20:30:29.573Z","__v":0},{"_id":"6abace5db0dc5fbdf2920388","deploymentId":"697a7cfa899b175f71812b73","questionText":"How do I make my own render style?","status":"active","generatedBy":"manual","createdAt":"2026-09-28T20:30:21.723Z","updatedAt":"2026-09-28T20:30:21.723Z","__v":0},{"_id":"6abace55b0dc5fbdf29202c3","deploymentId":"697a7cfa899b175f71812b73","questionText":"How do I explore colorways with Region Maps?","status":"active","generatedBy":"manual","createdAt":"2026-09-28T20:30:13.758Z","updatedAt":"2026-09-28T20:30:13.758Z","__v":0}],"googleFontsInlined":false},"customCss":[{"filePath":"style.css","content":".vz-facts{display:flex;flex-wrap:wrap;gap:1px;margin:1.25rem 0 1.5rem;border:1px solid rgba(15, 23, 42, 0.1);border-radius:12px;overflow:hidden;background:rgba(15, 23, 42, 0.1)}.vz-fact{flex:1 1 0;min-width:0;display:flex;flex-direction:column;gap:4px;padding:12px 14px;background:#fff;font-size:14px;line-height:1.45}.vz-fact-wide{flex-basis:100%}.vz-fact-label{font-size:11px;font-weight:600;letter-spacing:0.06em;text-transform:uppercase;color:rgba(15, 23, 42, 0.5)}.vz-fact-value{color:rgb(15, 23, 42)}.vz-fact-value a{color:inherit;text-decoration:underline;text-decoration-color:rgba(103, 144, 239, 0.5);text-underline-offset:2px}.vz-fact kbd,.vz-legend kbd{display:inline-block;min-width:1.5em;padding:0 5px;border:1px solid rgba(15, 23, 42, 0.15);border-bottom-width:2px;border-radius:5px;font-family:inherit;font-size:12px;line-height:1.6;text-align:center}.dark .vz-facts{border-color:rgba(255, 255, 255, 0.08);background:rgba(255, 255, 255, 0.08)}.dark .vz-fact{background:rgb(17, 17, 19)}.dark .vz-fact-label{color:rgba(255, 255, 255, 0.5)}.dark .vz-fact-value{color:rgba(255, 255, 255, 0.9)}.dark .vz-fact kbd,.dark .vz-legend kbd{border-color:rgba(255, 255, 255, 0.2)}.vz-stages{display:grid;grid-template-columns:repeat(auto-fit, minmax(160px, 1fr));gap:10px;margin:1rem 0 2rem}.vz-stage{display:flex;flex-direction:column;gap:6px;padding:14px;border:1px solid rgba(15, 23, 42, 0.1);border-radius:12px;text-decoration:none!important;transition:border-color 0.15s}.vz-stage:hover{border-color:rgb(103, 144, 239)}.vz-stage-step{font-size:11px;font-weight:600;letter-spacing:0.06em;text-transform:uppercase;color:rgb(103, 144, 239)}.vz-stage-name{font-weight:600;color:rgb(15, 23, 42)}.vz-stage-blurb{font-size:13px;line-height:1.45;color:rgba(15, 23, 42, 0.65)}.dark .vz-stage{border-color:rgba(255, 255, 255, 0.1)}.dark .vz-stage-name{color:rgba(255, 255, 255, 0.92)}.dark .vz-stage-blurb{color:rgba(255, 255, 255, 0.6)}.vz-num{display:inline-flex;align-items:center;justify-content:center;width:22px;height:22px;border-radius:999px;background:#6790ef;color:#fff;font-size:12px;font-weight:700}@media (max-width: 640px){.vz-fact{flex-basis:calc(50% - 1px)}.vz-fact-wide{flex-basis:100%}}img[src*=\"/images/docs/find-insert-\"],img[src*=\"/images/docs/find-studio-make3d\"],img[src*=\"/images/docs/find-modify-block\"],img[src*=\"/images/docs/find-export\"]{width:auto;max-width:100%;max-height:520px;margin-left:auto;margin-right:auto}.vz-ba{position:relative;width:100%;margin:1.25rem 0;overflow:hidden;border-radius:14px;border:1px solid rgba(15, 23, 42, 0.1);background:#f3f1ee;user-select:none}.dark .vz-ba{border-color:rgba(255, 255, 255, 0.1);background:#1d1d1f}.vz-ba-img{position:absolute;inset:0;width:100%;height:100%;object-fit:contain;margin:0!important;border-radius:0!important}.vz-ba-clip{position:absolute;inset:0}.vz-ba-line{position:absolute;top:0;bottom:0;width:2px;margin-left:-1px;background:#fff;box-shadow:0 0 0 1px rgba(0, 0, 0, 0.15);pointer-events:none}.vz-ba-handle{position:absolute;top:50%;left:50%;display:flex;align-items:center;justify-content:center;width:36px;height:36px;margin:-18px 0 0 -18px;border-radius:999px;background:#fff;color:#18181b;box-shadow:0 2px 10px rgba(0, 0, 0, 0.25)}.vz-ba-tag{position:absolute;top:12px;padding:3px 9px;border-radius:999px;background:rgba(17, 17, 19, 0.72);color:#fff;font-size:12px;font-weight:600;pointer-events:none}.vz-ba-tag-l{left:12px}.vz-ba-tag-r{right:12px}.vz-ba-range{position:absolute;inset:0;width:100%;height:100%;margin:0;opacity:0;cursor:ew-resize}.vz-hot{position:relative;margin:1.25rem 0;border-radius:14px;overflow:visible}.vz-hot-img{display:block;width:100%;height:auto;margin:0!important;border-radius:14px;border:1px solid rgba(15, 23, 42, 0.1)}.dark .vz-hot-img{border-color:rgba(255, 255, 255, 0.1)}.vz-hot-spot{position:absolute;transform:translate(-50%, -50%);text-decoration:none!important;border:0!important;outline:none;z-index:1}.vz-hot-num{display:flex;align-items:center;justify-content:center;width:26px;height:26px;border-radius:999px;background:#6790ef;color:#fff;font-size:13px;font-weight:700;box-shadow:0 0 0 2px #fff, 0 0 0 5px rgba(103, 144, 239, 0.35), 0 2px 6px rgba(0, 0, 0, 0.35);transition:transform 0.15s}.vz-hot-spot:hover .vz-hot-num,.vz-hot-spot:focus .vz-hot-num{transform:scale(1.12)}.vz-hot-tip{position:absolute;top:34px;left:-8px;display:none;flex-direction:column;gap:2px;width:max-content;max-width:240px;padding:8px 10px;border-radius:10px;background:#111113;color:#fff;font-size:13px;line-height:1.4;box-shadow:0 8px 24px rgba(0, 0, 0, 0.35)}.vz-hot-tip span{color:rgba(255, 255, 255, 0.72)}.vz-hot-tip-l{left:auto;right:-8px}.vz-hot-spot:hover,.vz-hot-spot:focus{z-index:3}.vz-hot-spot:hover .vz-hot-tip,.vz-hot-spot:focus .vz-hot-tip{display:flex}.vz-tasks{display:grid;gap:14px;margin:1rem 0 2rem}.vz-tasks-2{grid-template-columns:repeat(2, minmax(0, 1fr))}.vz-tasks-3{grid-template-columns:repeat(3, minmax(0, 1fr))}.vz-tasks-4{grid-template-columns:repeat(4, minmax(0, 1fr))}.vz-task{display:flex;flex-direction:column;overflow:hidden;border:1px solid rgba(15, 23, 42, 0.1);border-radius:14px;background:#fff;text-decoration:none!important;transition:border-color 0.15s, transform 0.15s}.vz-task:hover{border-color:rgb(103, 144, 239);transform:translateY(-1px)}.dark .vz-task{border-color:rgba(255, 255, 255, 0.1);background:rgb(22, 22, 24)}.vz-task-media{display:block;aspect-ratio:16 / 10;background:#ece9e5;overflow:hidden}.dark .vz-task-media{background:#1d1d1f}.vz-task-media img,.vz-task-media video{display:block;width:100%;height:100%;object-fit:cover;margin:0!important;border-radius:0!important}.vz-task-body{display:flex;flex-direction:column;gap:4px;padding:12px 14px 14px}.vz-task-title{font-weight:600;color:rgb(15, 23, 42)}.dark .vz-task-title{color:rgba(255, 255, 255, 0.92)}.vz-task-text{font-size:13px;line-height:1.45;color:rgba(15, 23, 42, 0.65)}.dark .vz-task-text{color:rgba(255, 255, 255, 0.6)}@media (max-width: 900px){.vz-tasks-3,.vz-tasks-4{grid-template-columns:repeat(2, minmax(0, 1fr))}}@media (max-width: 520px){.vz-tasks-2,.vz-tasks-3,.vz-tasks-4{grid-template-columns:minmax(0, 1fr)}}.vz-clip{margin:1.25rem 0}.vz-clip video{display:block;width:100%;height:auto;border-radius:14px;border:1px solid rgba(15, 23, 42, 0.1);background:#111}.dark .vz-clip video{border-color:rgba(255, 255, 255, 0.1)}.vz-clip figcaption{margin-top:8px;font-size:14px;color:rgba(15, 23, 42, 0.6);text-align:center}.dark .vz-clip figcaption{color:rgba(255, 255, 255, 0.55)}.vz-home{max-width:1180px;margin:0 auto;padding:48px 24px 96px}.vz-home section{margin-top:72px}.vz-home section:first-child{margin-top:0}.vz-hero{display:flex;flex-direction:column;gap:36px}.vz-hero-text{max-width:760px}.vz-eyebrow{margin:0 0 12px;font-size:13px;font-weight:600;letter-spacing:0.08em;text-transform:uppercase;color:rgb(103, 144, 239)}.vz-hero h1{margin:0;font-size:clamp(34px, 5vw, 56px);line-height:1.05;letter-spacing:-0.02em;font-weight:500;color:rgb(15, 23, 42)}.dark .vz-hero h1{color:#fff}.vz-hero-sub{margin:18px 0 0;font-size:19px;line-height:1.5;color:rgba(15, 23, 42, 0.7)}.dark .vz-hero-sub{color:rgba(255, 255, 255, 0.7)}.vz-hero-cta{display:flex;flex-wrap:wrap;gap:10px;margin-top:26px}.vz-btn{display:inline-flex;align-items:center;padding:10px 18px;border-radius:999px;border:1px solid rgba(15, 23, 42, 0.15);color:rgb(15, 23, 42)!important;font-weight:600;font-size:15px;text-decoration:none!important;background:rgba(255, 255, 255, 0.7)}.dark .vz-btn{border-color:rgba(255, 255, 255, 0.18);color:#fff!important;background:rgba(255, 255, 255, 0.04)}.vz-btn-primary{background:rgb(103, 144, 239)!important;border-color:rgb(103, 144, 239)!important;color:#fff!important}.vz-hero-search{margin:18px 0 0;font-size:14px;color:rgba(15, 23, 42, 0.55)}.dark .vz-hero-search{color:rgba(255, 255, 255, 0.5)}.vz-hero-search kbd,.vz-tool-key{display:inline-block;min-width:1.6em;padding:1px 6px;border:1px solid rgba(15, 23, 42, 0.18);border-bottom-width:2px;border-radius:6px;font-family:inherit;font-size:12px;text-align:center}.dark .vz-hero-search kbd,.dark .vz-tool-key{border-color:rgba(255, 255, 255, 0.22)}.vz-hero-art{display:block;width:100%;height:auto;border-radius:20px}.vz-h2{margin:0 0 8px;font-size:28px;font-weight:500;letter-spacing:-0.01em;color:rgb(15, 23, 42)}.dark .vz-h2{color:#fff}.vz-lead{margin:0 0 20px;font-size:16px;color:rgba(15, 23, 42, 0.65)}.dark .vz-lead{color:rgba(255, 255, 255, 0.6)}.vz-more{margin-top:4px;font-size:15px;color:rgba(15, 23, 42, 0.65)}.dark .vz-more{color:rgba(255, 255, 255, 0.6)}.vz-home a:not(.vz-btn):not(.vz-task):not(.vz-stage):not(.vz-tool):not(.vz-panel):not(.vz-hot-spot){color:rgb(103, 144, 239);text-decoration:none}.vz-toolrow{display:grid;grid-template-columns:repeat(3, minmax(0, 1fr));gap:12px}.vz-tool{position:relative;display:flex;flex-direction:column;gap:4px;padding:16px 18px;border:1px solid rgba(15, 23, 42, 0.1);border-radius:14px;background:#fff;text-decoration:none!important;color:rgba(15, 23, 42, 0.65);font-size:14px;line-height:1.45}.vz-tool b{color:rgb(15, 23, 42);font-size:16px}.vz-tool:hover{border-color:rgb(103, 144, 239)}.dark .vz-tool{border-color:rgba(255, 255, 255, 0.1);background:rgb(22, 22, 24);color:rgba(255, 255, 255, 0.6)}.dark .vz-tool b{color:rgba(255, 255, 255, 0.92)}.vz-tool-key{position:absolute;top:14px;right:14px}.vz-split{display:grid;grid-template-columns:repeat(3, minmax(0, 1fr));gap:14px}.vz-panel{display:flex;flex-direction:column;gap:8px;padding:22px;border-radius:16px;border:1px solid rgba(15, 23, 42, 0.1);background:rgba(255, 255, 255, 0.6);color:rgba(15, 23, 42, 0.68);font-size:15px;line-height:1.5;text-decoration:none!important}.vz-panel:hover{border-color:rgb(103, 144, 239)}.dark .vz-panel{border-color:rgba(255, 255, 255, 0.1);background:rgba(255, 255, 255, 0.03);color:rgba(255, 255, 255, 0.62)}.vz-panel-title{font-size:18px;font-weight:600;color:rgb(15, 23, 42)}.dark .vz-panel-title{color:#fff}.vz-panel-link{margin-top:auto;padding-top:6px;font-weight:600;color:rgb(103, 144, 239)}@media (max-width: 900px){.vz-toolrow,.vz-split{grid-template-columns:repeat(2, minmax(0, 1fr))}}@media (max-width: 560px){.vz-home{padding:28px 16px 64px}.vz-home section{margin-top:52px}.vz-toolrow,.vz-split{grid-template-columns:minmax(0, 1fr)}.vz-hero-sub{font-size:17px}}.vz-flow{display:grid;grid-template-columns:repeat(5, minmax(0, 1fr));gap:14px}.vz-flow-card{position:relative;display:flex;flex-direction:column;gap:10px;text-decoration:none!important}.vz-flow-card img{display:block;width:100%;height:auto;aspect-ratio:9 / 7;object-fit:cover;margin:0!important;border-radius:16px;border:1px solid rgba(15, 23, 42, 0.08);box-shadow:0 10px 30px -12px rgba(15, 23, 42, 0.25);transition:transform 0.2s}.vz-flow-card:hover img{transform:translateY(-2px)}.dark .vz-flow-card img{border-color:rgba(255, 255, 255, 0.08);box-shadow:0 10px 30px -12px rgba(0, 0, 0, 0.6)}.vz-flow-card span{font-size:14px;font-weight:600;text-align:center;color:rgb(15, 23, 42)}.dark .vz-flow-card span{color:rgba(255, 255, 255, 0.9)}.vz-flow-card:not(:last-child)::after{content:\"\";position:absolute;top:calc(50% - 22px);right:-13px;width:12px;height:12px;border-top:2px solid rgba(15, 23, 42, 0.35);border-right:2px solid rgba(15, 23, 42, 0.35);transform:rotate(45deg)}.dark .vz-flow-card:not(:last-child)::after{border-color:rgba(255, 255, 255, 0.35)}@media (max-width: 760px){.vz-flow{display:flex;overflow-x:auto;scroll-snap-type:x mandatory;padding-bottom:6px}.vz-flow-card{flex:0 0 62%;scroll-snap-align:start}.vz-flow-card::after{display:none}}.vz-hot-tip-up{top:auto;bottom:34px}img[src*=\"/images/find/\"]{width:auto;max-width:100%;max-height:640px;margin-left:auto;margin-right:auto}.vz-labeled{margin:1.25rem 0}.vz-labeled-grid{display:grid;gap:12px;padding:12px;border:1px solid rgba(15, 23, 42, 0.08);border-radius:16px;background:rgba(15, 23, 42, 0.03)}.vz-labeled-2{grid-template-columns:repeat(2, minmax(0, 1fr))}.vz-labeled-3{grid-template-columns:repeat(3, minmax(0, 1fr))}.vz-labeled-4{grid-template-columns:repeat(4, minmax(0, 1fr))}.vz-labeled-item{position:relative;display:flex;flex-direction:column;gap:8px}.vz-labeled-item img{display:block;width:100%;height:auto;margin:0;border-radius:10px}.vz-labeled-label{font-size:14px;font-weight:500;line-height:1.3;text-align:center;color:rgb(15, 23, 42)}.vz-labeled-arrows{column-gap:28px}.vz-labeled-arrows .vz-labeled-item:not(:last-child)::after{content:\"→\";position:absolute;top:calc(50% - 22px);right:-21px;font-size:15px;color:rgba(15, 23, 42, 0.4)}.vz-labeled figcaption{margin-top:8px;font-size:14px;color:rgba(15, 23, 42, 0.6);text-align:center}.dark .vz-labeled-grid{border-color:rgba(255, 255, 255, 0.08);background:rgba(255, 255, 255, 0.03)}.dark .vz-labeled-label{color:rgba(255, 255, 255, 0.9)}.dark .vz-labeled-arrows .vz-labeled-item:not(:last-child)::after{color:rgba(255, 255, 255, 0.4)}.dark .vz-labeled figcaption{color:rgba(255, 255, 255, 0.55)}@media (max-width: 640px){.vz-labeled-3,.vz-labeled-4{grid-template-columns:repeat(2, minmax(0, 1fr))}.vz-labeled-arrows{column-gap:12px}.vz-labeled-arrows .vz-labeled-item::after{display:none}}"}],"page":{"pagePath":"guides/edit-part-of-an-image","slug":"/guides/edit-part-of-an-image","pageMetadata":{"title":"Edit part of an image","sidebarTitle":"Edit part of an image","description":"Change one area of a render and keep the rest: select and prompt in Studio, erase objects, or recolor by part with Region Maps.","icon":"draw-polygon","href":"/guides/edit-part-of-an-image"},"description":{"compiledSource":"\"use strict\";\nconst {jsx: _jsx} = arguments[0];\nconst {useMDXComponents: _provideComponents} = arguments[0];\nfunction _createMdxContent(props) {\n const _components = {\n p: \"p\",\n ..._provideComponents(),\n ...props.components\n };\n return _jsx(_components.p, {\n children: \"Change one area of a render and keep the rest: select and prompt in Studio, erase objects, or recolor by part with Region Maps.\"\n });\n}\nfunction MDXContent(props = {}) {\n const {wrapper: MDXLayout} = {\n ..._provideComponents(),\n ...props.components\n };\n return MDXLayout ? _jsx(MDXLayout, {\n ...props,\n children: _jsx(_createMdxContent, {\n ...props\n })\n }) : _createMdxContent(props);\n}\nreturn {\n default: MDXContent\n};\n","frontmatter":{},"scope":{}},"pageType":"default","mdx":{"mdxSource":{"compiledSource":"\"use strict\";const{Fragment:_Fragment,jsx:_jsx,jsxs:_jsxs}=arguments[0];const{useMDXComponents:_provideComponents}=arguments[0];const N=({children})=>_jsx(`span`,{className:`vz-num`,children});const FeatureFacts=({where,worksIn,shortcut,credits,plans,status})=>_jsxs(`div`,{className:`vz-facts not-prose`,children:[where\u0026\u0026_jsxs(`div`,{className:`vz-fact vz-fact-wide`,children:[_jsx(`span`,{className:`vz-fact-label`,children:`Where to find it`}),_jsx(`span`,{className:`vz-fact-value`,children:where})]}),worksIn\u0026\u0026_jsxs(`div`,{className:`vz-fact`,children:[_jsx(`span`,{className:`vz-fact-label`,children:`Works in`}),_jsx(`span`,{className:`vz-fact-value`,children:worksIn})]}),shortcut\u0026\u0026_jsxs(`div`,{className:`vz-fact`,children:[_jsx(`span`,{className:`vz-fact-label`,children:`Shortcut`}),_jsx(`span`,{className:`vz-fact-value`,children:shortcut})]}),credits\u0026\u0026_jsxs(`div`,{className:`vz-fact`,children:[_jsx(`span`,{className:`vz-fact-label`,children:`Credits`}),_jsx(`span`,{className:`vz-fact-value`,children:credits})]}),plans\u0026\u0026_jsxs(`div`,{className:`vz-fact`,children:[_jsx(`span`,{className:`vz-fact-label`,children:`Plans`}),_jsx(`span`,{className:`vz-fact-value`,children:plans})]}),status\u0026\u0026_jsxs(`div`,{className:`vz-fact`,children:[_jsx(`span`,{className:`vz-fact-label`,children:`Status`}),_jsx(`span`,{className:`vz-fact-value`,children:status})]})]});function _createMdxContent(props){const _components={a:`a`,b:`b`,kbd:`kbd`,li:`li`,ol:`ol`,p:`p`,strong:`strong`,tbody:`tbody`,td:`td`,th:`th`,thead:`thead`,tr:`tr`,ul:`ul`,..._provideComponents(),...props.components},{Card,CardGroup,Frame,Heading,OptimizedImage,Step,Steps,Table,Tip,_MdxComponentBoundary}=_components;if(!Card)_missingMdxReference(`Card`,true);if(!CardGroup)_missingMdxReference(`CardGroup`,true);if(!Frame)_missingMdxReference(`Frame`,true);if(!Heading)_missingMdxReference(`Heading`,true);if(!OptimizedImage)_missingMdxReference(`OptimizedImage`,true);if(!Step)_missingMdxReference(`Step`,true);if(!Steps)_missingMdxReference(`Steps`,true);if(!Table)_missingMdxReference(`Table`,true);if(!Tip)_missingMdxReference(`Tip`,true);if(!_MdxComponentBoundary)_missingMdxReference(`_MdxComponentBoundary`,true);return _jsxs(_Fragment,{children:[_jsx(_components.p,{children:`Change one area, such as a sole or a logo, and keep everything else as it is.`}),`\n`,_jsx(_MdxComponentBoundary,{name:`FeatureFacts`,children:_jsx(FeatureFacts,{where:_jsxs(_Fragment,{children:[`Studio: press `,_jsx(_components.kbd,{children:`G`}),`, select, then prompt in `,_jsx(_components.b,{children:`Modify`}),`. Workbench: `,_jsx(_components.b,{children:`Create Region Map`}),`.`]}),worksIn:`Studio (selections, Magic Eraser) and Workbench (Region Maps)`,shortcut:_jsxs(_Fragment,{children:[_jsx(_components.kbd,{children:`G`}),` select, `,_jsx(_components.kbd,{children:`⇧`}),` + `,_jsx(_components.kbd,{children:`E`}),` Magic Eraser`]}),credits:_jsxs(_Fragment,{children:[`Selection edit: `,_jsx(_components.a,{href:`/vizcom-credits#modify`,children:`1K Modify price`}),`. Magic Eraser: `,_jsx(_components.a,{href:`/vizcom-credits#other-features`,children:`2`}),`. Region Map: 30 to create, 30 per Generate`]}),plans:`All plans. Viewers can't edit or create Region Maps.`,status:`Region Maps: Beta`})}),`\n`,_jsx(Frame,{caption:`Select an area (1), describe the change (2); Offset and Deselect are in the settings row (3).`,children:_jsx(OptimizedImage,{src:`https://mintcdn.com/vizcom-c4034e9b/IrF-_wtAOnnkeWbq/images/find/studio-selection.png?fit=max\u0026auto=format\u0026n=IrF-_wtAOnnkeWbq\u0026q=85\u0026s=e9b6f9947df0927d979f6ccf37059fcf`,alt:`Studio with a dashed rectangle selection around the grip of a grey and lime-green drill render, marked 1. The Modify tab prompt, marked 2, reads: Change the grip to orange rubber with a fine knurled texture. The selection settings row, marked 3, has Add to selection, Remove from selection, Copy selection to layer, Invert selection, Offset and Deselect.`,width:`2560`,height:`1600`,\"data-og-width\":`2560`,\"data-og-height\":`1600`,\"data-path\":`images/find/studio-selection.png`,\"data-optimize\":`true`,\"data-opv\":`3`,srcset:`https://mintcdn.com/vizcom-c4034e9b/IrF-_wtAOnnkeWbq/images/find/studio-selection.png?w=280\u0026fit=max\u0026auto=format\u0026n=IrF-_wtAOnnkeWbq\u0026q=85\u0026s=c7d37246ebc1a73269b40da1be54135e 280w, https://mintcdn.com/vizcom-c4034e9b/IrF-_wtAOnnkeWbq/images/find/studio-selection.png?w=560\u0026fit=max\u0026auto=format\u0026n=IrF-_wtAOnnkeWbq\u0026q=85\u0026s=c90f56826856a4cc8ca3487e9d2eafd7 560w, https://mintcdn.com/vizcom-c4034e9b/IrF-_wtAOnnkeWbq/images/find/studio-selection.png?w=840\u0026fit=max\u0026auto=format\u0026n=IrF-_wtAOnnkeWbq\u0026q=85\u0026s=b2ec3be692e6f62fe0283db9c14d34da 840w, https://mintcdn.com/vizcom-c4034e9b/IrF-_wtAOnnkeWbq/images/find/studio-selection.png?w=1100\u0026fit=max\u0026auto=format\u0026n=IrF-_wtAOnnkeWbq\u0026q=85\u0026s=1d0bb0af0251e6a3f3758bbf78dc4cef 1100w, https://mintcdn.com/vizcom-c4034e9b/IrF-_wtAOnnkeWbq/images/find/studio-selection.png?w=1650\u0026fit=max\u0026auto=format\u0026n=IrF-_wtAOnnkeWbq\u0026q=85\u0026s=0f89b6bcd47dfc648f32713ec3317e28 1650w, https://mintcdn.com/vizcom-c4034e9b/IrF-_wtAOnnkeWbq/images/find/studio-selection.png?w=2500\u0026fit=max\u0026auto=format\u0026n=IrF-_wtAOnnkeWbq\u0026q=85\u0026s=98906c3a56ae4e145c05b0d3898338ba 2500w`})}),`\n`,_jsx(Heading,{level:`2`,id:`pick-a-method`,children:`Pick a method`}),`\n`,_jsxs(Table,{children:[_jsx(_components.thead,{children:_jsxs(_components.tr,{children:[_jsx(_components.th,{children:`You want to`}),_jsx(_components.th,{children:`Use`})]})}),_jsxs(_components.tbody,{children:[_jsxs(_components.tr,{children:[_jsx(_components.td,{children:`Make a small change`}),_jsx(_components.td,{children:`A prompt that names what stays`})]}),_jsxs(_components.tr,{children:[_jsx(_components.td,{children:`Guarantee the rest stays`}),_jsxs(_components.td,{children:[`A `,_jsx(_components.a,{href:`/editing-areas`,children:`selection`}),`, then `,_jsx(_components.strong,{children:`Modify`}),` (Studio)`]})]}),_jsxs(_components.tr,{children:[_jsx(_components.td,{children:`Remove an object`}),_jsxs(_components.td,{children:[_jsx(_components.a,{href:`/drawing-in-vizcom`,children:`Magic Eraser`}),` (Studio)`]})]}),_jsxs(_components.tr,{children:[_jsx(_components.td,{children:`Recolor part by part`}),_jsxs(_components.td,{children:[_jsx(_components.strong,{children:`Region Maps`}),` (Workbench)`]})]})]})]}),`\n`,_jsx(Heading,{level:`2`,id:`edit-a-selected-area-in-studio`,children:`Edit a selected area in Studio`}),`\n`,_jsxs(Steps,{children:[_jsx(Step,{title:`Open the image in Studio`,children:_jsx(_components.p,{children:`Double-click it.`})}),_jsxs(Step,{title:`Pick a selection tool`,children:[_jsxs(_components.p,{children:[`Press `,_jsx(`kbd`,{children:`G`}),`, or choose one from the selection menu.`]}),_jsx(Frame,{caption:`The selection button (1) and its menu (2).`,children:_jsx(OptimizedImage,{src:`https://mintcdn.com/vizcom-c4034e9b/FHfxWMtC8cMIGOnx/images/find/studio-selection-menu.png?fit=max\u0026auto=format\u0026n=FHfxWMtC8cMIGOnx\u0026q=85\u0026s=4c7ec1b5b12ee9abe6617cfbc5daaa4c`,alt:`The Studio toolbar with the selection button marked 1 and its open menu marked 2: Lasso selection (G), Rectangle selection, Brush selection, Bezier selection and Auto selection.`,width:`1100`,height:`536`,\"data-og-width\":`1100`,\"data-og-height\":`536`,\"data-path\":`images/find/studio-selection-menu.png`,\"data-optimize\":`true`,\"data-opv\":`3`,srcset:`https://mintcdn.com/vizcom-c4034e9b/FHfxWMtC8cMIGOnx/images/find/studio-selection-menu.png?w=280\u0026fit=max\u0026auto=format\u0026n=FHfxWMtC8cMIGOnx\u0026q=85\u0026s=f3c2ac5a8f9470e50b0b6fb0ced3c31b 280w, https://mintcdn.com/vizcom-c4034e9b/FHfxWMtC8cMIGOnx/images/find/studio-selection-menu.png?w=560\u0026fit=max\u0026auto=format\u0026n=FHfxWMtC8cMIGOnx\u0026q=85\u0026s=0f9bdcd817f161fa732922a7a2e64d6b 560w, https://mintcdn.com/vizcom-c4034e9b/FHfxWMtC8cMIGOnx/images/find/studio-selection-menu.png?w=840\u0026fit=max\u0026auto=format\u0026n=FHfxWMtC8cMIGOnx\u0026q=85\u0026s=706a97f18d35a71cbe7f2920e9f0de6d 840w, https://mintcdn.com/vizcom-c4034e9b/FHfxWMtC8cMIGOnx/images/find/studio-selection-menu.png?w=1100\u0026fit=max\u0026auto=format\u0026n=FHfxWMtC8cMIGOnx\u0026q=85\u0026s=95926ab0d371e9b3f59cba819283aa5b 1100w, https://mintcdn.com/vizcom-c4034e9b/FHfxWMtC8cMIGOnx/images/find/studio-selection-menu.png?w=1650\u0026fit=max\u0026auto=format\u0026n=FHfxWMtC8cMIGOnx\u0026q=85\u0026s=e08d6cf50631da275ddc91b80e90e8fe 1650w, https://mintcdn.com/vizcom-c4034e9b/FHfxWMtC8cMIGOnx/images/find/studio-selection-menu.png?w=2500\u0026fit=max\u0026auto=format\u0026n=FHfxWMtC8cMIGOnx\u0026q=85\u0026s=0ed0dc9aa56f2ef7f58bdb0a0cf86555 2500w`})})]}),_jsx(Step,{title:`Select the area`,children:_jsxs(_components.p,{children:[`Draw around the part `,_jsx(_MdxComponentBoundary,{name:`N`,children:_jsx(N,{children:`1`})}),`. Hold `,_jsx(`kbd`,{children:`⇧`}),` to add or `,_jsx(`kbd`,{children:`⌥`}),`/`,_jsx(`kbd`,{children:`Alt`}),` to remove. `,_jsx(_components.strong,{children:`Offset`}),` `,_jsx(_MdxComponentBoundary,{name:`N`,children:_jsx(N,{children:`3`})}),` grows or shrinks it.`]})}),_jsx(Step,{title:`Describe only the change`,children:_jsxs(_components.p,{children:[`Type what goes inside the selection `,_jsx(_MdxComponentBoundary,{name:`N`,children:_jsx(N,{children:`2`})}),`, such as “quilted brown leather seat”.`]})}),_jsx(Step,{title:`Generate`,children:_jsxs(_components.p,{children:[`Press `,_jsx(`kbd`,{children:`Enter`}),`.`]})}),_jsx(Step,{title:`Add the result`,children:_jsxs(_components.p,{children:[`Click `,_jsx(_components.strong,{children:`Add`}),`. Only the selected area lands on a new layer.`]})}),_jsx(Step,{title:`Deselect`,children:_jsxs(_components.p,{children:[`Press `,_jsx(`kbd`,{children:`⌘`}),`/`,_jsx(`kbd`,{children:`Ctrl`}),` + `,_jsx(`kbd`,{children:`D`}),`.`]})})]}),`\n`,_jsx(Tip,{children:_jsxs(_components.p,{children:[`Turn `,_jsx(_components.strong,{children:`Selected area only`}),` off to add the full generated image, keeping shading the edit added at the edges.`]})}),`\n`,_jsx(Heading,{level:`2`,id:`remove-an-object-with-magic-eraser`,children:`Remove an object with Magic Eraser`}),`\n`,_jsxs(_components.ol,{children:[`\n`,_jsxs(_components.li,{children:[`In Studio, press `,_jsx(`kbd`,{children:`⇧`}),` + `,_jsx(`kbd`,{children:`E`}),`.`]}),`\n`,_jsx(_components.li,{children:`Paint over the object. Vizcom removes it and fills in behind it.`}),`\n`]}),`\n`,_jsxs(_components.p,{children:[`Check `,_jsx(_components.strong,{children:`Remove multiple`}),` to paint several objects, then click `,_jsx(_components.strong,{children:`Erase`}),`.`]}),`\n`,_jsx(Heading,{level:`2`,id:`recolor-parts-with-region-maps`,children:`Recolor parts with Region Maps`}),`\n`,_jsxs(_components.p,{children:[`Split a product image into parts, recolor each one instantly, then `,_jsx(_components.strong,{children:`Generate`}),` a new photoreal image.`]}),`\n`,_jsx(Frame,{caption:`Select an image: Create Region Map is in its toolbar (2), next to Edit (1).`,children:_jsx(OptimizedImage,{src:`https://mintcdn.com/vizcom-c4034e9b/FHfxWMtC8cMIGOnx/images/find/image-toolbar-region-map.png?fit=max\u0026auto=format\u0026n=FHfxWMtC8cMIGOnx\u0026q=85\u0026s=ed43b459e6fcbfc91a59cde06976e907`,alt:`A selected drill render named Drill render with its toolbar above it. Callouts mark 1 Edit and 2 Create Region Map. The 1:1 aspect ratio menu, Download, Quick actions, Show image details and More actions are unmarked.`,width:`948`,height:`984`,\"data-og-width\":`948`,\"data-og-height\":`984`,\"data-path\":`images/find/image-toolbar-region-map.png`,\"data-optimize\":`true`,\"data-opv\":`3`,srcset:`https://mintcdn.com/vizcom-c4034e9b/FHfxWMtC8cMIGOnx/images/find/image-toolbar-region-map.png?w=280\u0026fit=max\u0026auto=format\u0026n=FHfxWMtC8cMIGOnx\u0026q=85\u0026s=3c7df29a5c61521d5b600f28c994c3ea 280w, https://mintcdn.com/vizcom-c4034e9b/FHfxWMtC8cMIGOnx/images/find/image-toolbar-region-map.png?w=560\u0026fit=max\u0026auto=format\u0026n=FHfxWMtC8cMIGOnx\u0026q=85\u0026s=838a42757c45443a16ca51f546f75d5b 560w, https://mintcdn.com/vizcom-c4034e9b/FHfxWMtC8cMIGOnx/images/find/image-toolbar-region-map.png?w=840\u0026fit=max\u0026auto=format\u0026n=FHfxWMtC8cMIGOnx\u0026q=85\u0026s=175e389926e136fe10d89120c60d5b72 840w, https://mintcdn.com/vizcom-c4034e9b/FHfxWMtC8cMIGOnx/images/find/image-toolbar-region-map.png?w=1100\u0026fit=max\u0026auto=format\u0026n=FHfxWMtC8cMIGOnx\u0026q=85\u0026s=3657751f1414c06166263c298219e2e9 1100w, https://mintcdn.com/vizcom-c4034e9b/FHfxWMtC8cMIGOnx/images/find/image-toolbar-region-map.png?w=1650\u0026fit=max\u0026auto=format\u0026n=FHfxWMtC8cMIGOnx\u0026q=85\u0026s=b36c0595489b22db80cd3beedd51f131 1650w, https://mintcdn.com/vizcom-c4034e9b/FHfxWMtC8cMIGOnx/images/find/image-toolbar-region-map.png?w=2500\u0026fit=max\u0026auto=format\u0026n=FHfxWMtC8cMIGOnx\u0026q=85\u0026s=3d1ad44063ea7ea11132c9e944f87a09 2500w`})}),`\n`,_jsx(`video`,{src:`https://mintcdn.com/vizcom-c4034e9b/l3hebjVqvRBa2E6g/videos/Region-Maps-1.mp4?fit=max\u0026auto=format\u0026n=l3hebjVqvRBa2E6g\u0026q=85\u0026s=641c9ff4b86f1f9446a2f08a235b9f33`,controls:true,\"aria-label\":`Creating a Region Map from a product image and recoloring its regions`,\"data-path\":`videos/Region-Maps-1.mp4`}),`\n`,_jsx(Heading,{level:`3`,id:`create-a-region-map`,children:`Create a Region Map`}),`\n`,_jsxs(_components.ol,{children:[`\n`,_jsx(_components.li,{children:`Select a clean, evenly lit render on a plain background.`}),`\n`,_jsxs(_components.li,{children:[`Click `,_jsx(_components.strong,{children:`Create Region Map`}),` in its toolbar.`]}),`\n`,_jsxs(_components.li,{children:[`Wait for the Regions image and the `,_jsx(_components.strong,{children:`Regions`}),` panel to appear.`]}),`\n`]}),`\n`,_jsx(Heading,{level:`3`,id:`fix-the-regions`,children:`Fix the regions`}),`\n`,_jsxs(_components.p,{children:[`Open a region and click `,_jsx(_components.strong,{children:`Edit Region`}),`, `,_jsx(_components.strong,{children:`Divide Region`}),`, `,_jsx(_components.strong,{children:`Clear Region`}),` or `,_jsx(_components.strong,{children:`Split Islands`}),`. To merge, select several and click `,_jsx(_components.strong,{children:`Merge`}),`.`]}),`\n`,_jsx(Heading,{level:`3`,id:`change-colors-and-materials`,children:`Change colors and materials`}),`\n`,_jsxs(_components.p,{children:[`Open a region and click its `,_jsx(_components.strong,{children:`Material`}),` swatch to pick a color or texture. In `,_jsx(_components.strong,{children:`All Regions`}),`, click `,_jsx(_components.strong,{children:`Apply Palette`}),` to color every region at once.`]}),`\n`,_jsx(`video`,{src:`https://mintcdn.com/vizcom-c4034e9b/l3hebjVqvRBa2E6g/videos/Region-Maps-2.mp4?fit=max\u0026auto=format\u0026n=l3hebjVqvRBa2E6g\u0026q=85\u0026s=5748c2497171e33bc8a8870bbaa308ee`,controls:true,\"aria-label\":`Applying colors and palettes to the regions of a product image`,\"data-path\":`videos/Region-Maps-2.mp4`}),`\n`,_jsx(Heading,{level:`3`,id:`finish`,children:`Finish`}),`\n`,_jsxs(_components.p,{children:[`Click `,_jsx(_components.strong,{children:`Generate`}),` for a photoreal image, or `,_jsx(_components.strong,{children:`Flatten`}),` to use the edit in other blocks or Studio. Editing regions in between is free.`]}),`\n`,_jsx(Frame,{caption:`A pattern dropped on one region of a running vest.`,children:_jsx(OptimizedImage,{src:`https://mintcdn.com/vizcom-c4034e9b/I-2hvc0QrsSa4kp4/images/examples/region-maps-vest.webp?fit=max\u0026auto=format\u0026n=I-2hvc0QrsSa4kp4\u0026q=85\u0026s=5f34b7327b1cbacce5c94fe07009d2b7`,alt:`Left: a grey running vest split into regions, with a pattern being dropped onto Region 1. Right: the same vest with a colorful marbled pattern on the selected regions and the rest unchanged.`,width:`1920`,height:`1080`,\"data-og-width\":`1920`,\"data-og-height\":`1080`,\"data-path\":`images/examples/region-maps-vest.webp`,\"data-optimize\":`true`,\"data-opv\":`3`,srcset:`https://mintcdn.com/vizcom-c4034e9b/I-2hvc0QrsSa4kp4/images/examples/region-maps-vest.webp?w=280\u0026fit=max\u0026auto=format\u0026n=I-2hvc0QrsSa4kp4\u0026q=85\u0026s=6061a424a0cd0d70eb4707d9c341dea0 280w, https://mintcdn.com/vizcom-c4034e9b/I-2hvc0QrsSa4kp4/images/examples/region-maps-vest.webp?w=560\u0026fit=max\u0026auto=format\u0026n=I-2hvc0QrsSa4kp4\u0026q=85\u0026s=61b08ddd09e26009bc0ab1528422df01 560w, https://mintcdn.com/vizcom-c4034e9b/I-2hvc0QrsSa4kp4/images/examples/region-maps-vest.webp?w=840\u0026fit=max\u0026auto=format\u0026n=I-2hvc0QrsSa4kp4\u0026q=85\u0026s=765b0e53a174e74245562104c1d26438 840w, https://mintcdn.com/vizcom-c4034e9b/I-2hvc0QrsSa4kp4/images/examples/region-maps-vest.webp?w=1100\u0026fit=max\u0026auto=format\u0026n=I-2hvc0QrsSa4kp4\u0026q=85\u0026s=d330a433c8b81c28c47c0595f75c61da 1100w, https://mintcdn.com/vizcom-c4034e9b/I-2hvc0QrsSa4kp4/images/examples/region-maps-vest.webp?w=1650\u0026fit=max\u0026auto=format\u0026n=I-2hvc0QrsSa4kp4\u0026q=85\u0026s=4b8f23d6586a8c7cbc07057526b57697 1650w, https://mintcdn.com/vizcom-c4034e9b/I-2hvc0QrsSa4kp4/images/examples/region-maps-vest.webp?w=2500\u0026fit=max\u0026auto=format\u0026n=I-2hvc0QrsSa4kp4\u0026q=85\u0026s=84b87e05389382dbe9a99926db1f3358 2500w`})}),`\n`,_jsxs(_components.p,{children:[`A Regions image can’t be split again or opened in Studio until you `,_jsx(_components.strong,{children:`Flatten`}),` it.`]}),`\n`,_jsx(Heading,{level:`2`,id:`get-better-results`,children:`Get better results`}),`\n`,_jsxs(_components.ul,{children:[`\n`,_jsxs(_components.li,{children:[_jsx(_components.strong,{children:`Select a little beyond the edge`}),` so the edit blends in.`]}),`\n`,_jsx(_components.li,{children:_jsx(_components.strong,{children:`Fix regions before you color them.`})}),`\n`,_jsxs(_components.li,{children:[_jsx(_components.strong,{children:`No selection?`}),` End the prompt with “Keep the same art style and leave the rest of the image unchanged.”`]}),`\n`]}),`\n`,_jsx(Heading,{level:`2`,id:`related`,children:`Related`}),`\n`,_jsxs(CardGroup,{cols:2,children:[_jsx(Card,{title:`Colors and materials`,href:`/guides/colors-and-materials`,icon:`palette`,children:_jsx(_components.p,{children:`Palettes and colorways.`})}),_jsx(Card,{title:`Write prompts that work`,href:`/prompting-in-modify`,icon:`comment-dots`,children:_jsx(_components.p,{children:`Say what changes and what stays.`})}),_jsx(Card,{title:`Selections`,href:`/editing-areas`,icon:`vector-square`,children:_jsx(_components.p,{children:`Every selection tool.`})}),_jsx(Card,{title:`Region Maps`,href:`/region-maps`,icon:`table-cells`,children:_jsx(_components.p,{children:`Region tools and materials.`})})]})]})}function MDXContent(props={}){const{wrapper:MDXLayout}={..._provideComponents(),...props.components};return MDXLayout?_jsx(MDXLayout,{...props,children:_jsx(_createMdxContent,{...props})}):_createMdxContent(props)}return{N,FeatureFacts,default:MDXContent};function _missingMdxReference(id,component){throw new Error(`Expected `+(component?`component`:`object`)+\" `\"+id+\"` to be defined: you likely forgot to import, pass, or provide it.\")}","frontmatter":{},"scope":{"codeStyling":"system","config":{},"pageMetadata":{"title":"Edit part of an image","sidebarTitle":"Edit part of an image","description":"Change one area of a render and keep the rest: select and prompt in Studio, erase objects, or recolor by part with Region Maps.","icon":"draw-polygon","href":"/guides/edit-part-of-an-image"}}},"mdxSourceWithNoJs":null,"noJsSplices":[[134,146,"FeatureFacts=()=>null;const N=({children"],[193,1369,""],[18200,18220,"FeatureFacts,N,defau"]]},"mdxExtracts":{"tableOfContents":[{"title":"Pick a method","slug":"pick-a-method","depth":2,"children":[]},{"title":"Edit a selected area in Studio","slug":"edit-a-selected-area-in-studio","depth":2,"children":[]},{"title":"Remove an object with Magic Eraser","slug":"remove-an-object-with-magic-eraser","depth":2,"children":[]},{"title":"Recolor parts with Region Maps","slug":"recolor-parts-with-region-maps","depth":2,"children":[{"title":"Create a Region Map","slug":"create-a-region-map","depth":3,"children":[]},{"title":"Fix the regions","slug":"fix-the-regions","depth":3,"children":[]},{"title":"Change colors and materials","slug":"change-colors-and-materials","depth":3,"children":[]},{"title":"Finish","slug":"finish","depth":3,"children":[]}]},{"title":"Get better results","slug":"get-better-results","depth":2,"children":[]},{"title":"Related","slug":"related","depth":2,"children":[]}],"codeExamples":{}},"jsLinks":[],"subdomain":"vizcom-c4034e9b","siteName":"Vizcom Docs","title":"Edit part of an image - Vizcom Docs","navMaps":{"firstHrefInVersion":{},"firstHrefInLanguage":{}},"lastModified":"2026-11-10T18:23:42.713Z","originalFileLocation":"guides/edit-part-of-an-image.mdx"},"headHtml":"\u003cscript data-mint-head>(function(){var d=document.documentElement,p=null;if(!p){try{p=localStorage.getItem(\"isDarkMode\")}catch(e){}if(p==='true')p='dark';else if(p==='false')p='light';if(p!=='light'\u0026\u0026p!=='dark'\u0026\u0026p!=='system')p=\"system\"}var r=p==='system'?(matchMedia(\"(prefers-color-scheme: dark)\").matches?'dark':'light'):p;d.classList.remove(r==='dark'?'light':'dark');d.classList.add(r);d.setAttribute(\"data-theme-preference\",p)})();\u003c/script>\u003cmeta data-mint-head name=\"description\" content=\"Change one area of a render and keep the rest: select and prompt in Studio, erase objects, or recolor by part with Region Maps.\">\u003cmeta data-mint-head name=\"application-name\" content=\"Vizcom Docs\">\u003cmeta data-mint-head name=\"generator\" content=\"Mintlify\">\u003clink data-mint-head rel=\"icon\" type=\"image/png\" sizes=\"192x192\" href=\"/mintlify-assets/_mintlify/favicons/vizcom-c4034e9b/PS8z58R86mrG4x3V/_generated/favicon/android-chrome-192x192.png\" media=\"(prefers-color-scheme: light)\">\u003clink data-mint-head rel=\"apple-touch-icon\" type=\"image/png\" sizes=\"180x180\" href=\"/mintlify-assets/_mintlify/favicons/vizcom-c4034e9b/PS8z58R86mrG4x3V/_generated/favicon/apple-touch-icon.png\">\u003clink data-mint-head rel=\"icon\" type=\"image/png\" sizes=\"16x16\" href=\"/mintlify-assets/_mintlify/favicons/vizcom-c4034e9b/PS8z58R86mrG4x3V/_generated/favicon/favicon-16x16.png\" media=\"(prefers-color-scheme: light)\">\u003clink data-mint-head rel=\"icon\" type=\"image/png\" sizes=\"32x32\" href=\"/mintlify-assets/_mintlify/favicons/vizcom-c4034e9b/PS8z58R86mrG4x3V/_generated/favicon/favicon-32x32.png\" media=\"(prefers-color-scheme: light)\">\u003clink data-mint-head rel=\"shortcut icon\" type=\"image/x-icon\" href=\"/mintlify-assets/_mintlify/favicons/vizcom-c4034e9b/PS8z58R86mrG4x3V/_generated/favicon/favicon.ico\" media=\"(prefers-color-scheme: light)\">\u003clink data-mint-head rel=\"icon\" type=\"image/png\" sizes=\"192x192\" href=\"/mintlify-assets/_mintlify/favicons/vizcom-c4034e9b/PS8z58R86mrG4x3V/_generated/favicon-dark/android-chrome-192x192.png\" media=\"(prefers-color-scheme: dark)\">\u003clink data-mint-head rel=\"icon\" type=\"image/png\" sizes=\"16x16\" href=\"/mintlify-assets/_mintlify/favicons/vizcom-c4034e9b/PS8z58R86mrG4x3V/_generated/favicon-dark/favicon-16x16.png\" media=\"(prefers-color-scheme: dark)\">\u003clink data-mint-head rel=\"icon\" type=\"image/png\" sizes=\"32x32\" href=\"/mintlify-assets/_mintlify/favicons/vizcom-c4034e9b/PS8z58R86mrG4x3V/_generated/favicon-dark/favicon-32x32.png\" media=\"(prefers-color-scheme: dark)\">\u003clink data-mint-head rel=\"shortcut icon\" type=\"image/x-icon\" href=\"/mintlify-assets/_mintlify/favicons/vizcom-c4034e9b/PS8z58R86mrG4x3V/_generated/favicon-dark/favicon.ico\" media=\"(prefers-color-scheme: dark)\">\u003cmeta data-mint-head property=\"og:title\" content=\"Edit part of an image - Vizcom Docs\">\u003cmeta data-mint-head property=\"og:description\" content=\"Change one area of a render and keep the rest: select and prompt in Studio, erase objects, or recolor by part with Region Maps.\">\u003cmeta data-mint-head property=\"og:site_name\" content=\"Vizcom Docs\">\u003cmeta data-mint-head property=\"og:url\" content=\"https://docs.vizcom.com/guides/edit-part-of-an-image\">\u003cmeta data-mint-head property=\"og:type\" content=\"website\">\u003cmeta data-mint-head property=\"og:image\" content=\"https://vizcom-c4034e9b.mintlify.site/_mintlify/api/og/v2?division=Refine\u0026amp;title=Edit+part+of+an+image\u0026amp;description=Change+one+area+of+a+render+and+keep+the+rest%3A+select+and+prompt+in+Studio%2C+erase+objects%2C+or+recolor+by+part+with+Region+Maps.\u0026amp;theme=a30f5c4af89b53f5167ddfc1\u0026amp;signature=6a7a49477ecad30fed7d450d7e547619b25d3b1a2d7948bce28cf2a68e46073a\">\u003cmeta data-mint-head property=\"og:image:width\" content=\"1200\">\u003cmeta data-mint-head property=\"og:image:height\" content=\"630\">\u003cmeta data-mint-head name=\"twitter:card\" content=\"summary_large_image\">\u003cmeta data-mint-head name=\"twitter:title\" content=\"Edit part of an image - Vizcom Docs\">\u003cmeta data-mint-head name=\"twitter:description\" content=\"Change one area of a render and keep the rest: select and prompt in Studio, erase objects, or recolor by part with Region Maps.\">\u003cmeta data-mint-head name=\"twitter:image\" content=\"https://vizcom-c4034e9b.mintlify.site/_mintlify/api/og/v2?division=Refine\u0026amp;title=Edit+part+of+an+image\u0026amp;description=Change+one+area+of+a+render+and+keep+the+rest%3A+select+and+prompt+in+Studio%2C+erase+objects%2C+or+recolor+by+part+with+Region+Maps.\u0026amp;theme=a30f5c4af89b53f5167ddfc1\u0026amp;signature=6a7a49477ecad30fed7d450d7e547619b25d3b1a2d7948bce28cf2a68e46073a\">\u003cmeta data-mint-head name=\"twitter:image:width\" content=\"1200\">\u003cmeta data-mint-head name=\"twitter:image:height\" content=\"630\">\u003cmeta data-mint-head name=\"msapplication-config\" content=\"/mintlify-assets/_mintlify/favicons/vizcom-c4034e9b/PS8z58R86mrG4x3V/_generated/favicon/browserconfig.xml\">\u003cmeta data-mint-head name=\"apple-mobile-web-app-title\" content=\"Vizcom Docs\">\u003cmeta data-mint-head name=\"msapplication-TileColor\" content=\"#6790EF\">\u003clink data-mint-head rel=\"canonical\" href=\"https://docs.vizcom.com/guides/edit-part-of-an-image\">\u003clink data-mint-head rel=\"alternate\" type=\"application/xml\" href=\"/sitemap.xml\">\u003clink data-mint-head rel=\"alternate\" type=\"text/markdown\" href=\"/guides/edit-part-of-an-image.md\">\u003cscript data-mint-head type=\"application/ld+json\">{\"@context\":\"https://schema.org\",\"@graph\":[{\"@type\":\"Organization\",\"@id\":\"https://docs.vizcom.com/#organization\",\"name\":\"Vizcom Docs\",\"url\":\"https://docs.vizcom.com\",\"logo\":{\"@type\":\"ImageObject\",\"url\":\"https://mintcdn.com/vizcom-c4034e9b/l3hebjVqvRBa2E6g/images/logo-dark.svg?fit=max\u0026auto=format\u0026n=l3hebjVqvRBa2E6g\u0026q=85\u0026s=22515442b3097b2a6ffbf4ede9f56565\"}},{\"@type\":\"WebSite\",\"@id\":\"https://docs.vizcom.com#website\",\"name\":\"Vizcom Docs\",\"url\":\"https://docs.vizcom.com\",\"publisher\":{\"@id\":\"https://docs.vizcom.com/#organization\"}},{\"@type\":\"WebPage\",\"@id\":\"https://docs.vizcom.com/guides/edit-part-of-an-image#webpage\",\"url\":\"https://docs.vizcom.com/guides/edit-part-of-an-image\",\"name\":\"Edit part of an image\",\"description\":\"Change one area of a render and keep the rest: select and prompt in Studio, erase objects, or recolor by part with Region Maps.\",\"dateModified\":\"2026-11-10T18:23:42.713Z\",\"isPartOf\":{\"@id\":\"https://docs.vizcom.com#website\"},\"breadcrumb\":{\"@id\":\"https://docs.vizcom.com/guides/edit-part-of-an-image#breadcrumb\"}},{\"@type\":\"BreadcrumbList\",\"@id\":\"https://docs.vizcom.com/guides/edit-part-of-an-image#breadcrumb\",\"itemListElement\":[{\"@type\":\"ListItem\",\"position\":1,\"name\":\"Vizcom Docs\",\"item\":\"https://docs.vizcom.com\"},{\"@type\":\"ListItem\",\"position\":2,\"name\":\"Edit part of an image\",\"item\":\"https://docs.vizcom.com/guides/edit-part-of-an-image\"}]},{\"@type\":[\"Article\",\"TechArticle\"],\"@id\":\"https://docs.vizcom.com/guides/edit-part-of-an-image#article\",\"headline\":\"Edit part of an image\",\"name\":\"Edit part of an image\",\"description\":\"Change one area of a render and keep the rest: select and prompt in Studio, erase objects, or recolor by part with Region Maps.\",\"url\":\"https://docs.vizcom.com/guides/edit-part-of-an-image\",\"mainEntityOfPage\":{\"@id\":\"https://docs.vizcom.com/guides/edit-part-of-an-image#webpage\"},\"dateModified\":\"2026-11-10T18:23:42.713Z\",\"publisher\":{\"@id\":\"https://docs.vizcom.com/#organization\"},\"isPartOf\":{\"@id\":\"https://docs.vizcom.com#website\"}}]}\u003c/script>\u003cscript data-mint-head type=\"application/ld+json\">{\"@context\":\"https://schema.org\",\"@type\":\"WebSite\",\"name\":\"Vizcom Docs\",\"creator\":{\"@type\":\"Organization\",\"name\":\"Mintlify\",\"url\":\"https://mintlify.com\"}}\u003c/script>","siteName":"Vizcom Docs","nav":{"global":null,"tabs":[{"tab":"Guides","icon":"book-open","groups":[{"group":"Start here","pages":[{"title":"Welcome to Vizcom Documentation","sidebarTitle":"Welcome","icon":"house","mode":"custom","href":""},{"title":"Quickstart: your first render","sidebarTitle":"Quickstart","icon":"rocket","href":"/get-started/quickstart"},{"title":"Creative Interface","sidebarTitle":"Workbench and Studio","icon":"table-columns","href":"/creative-interface"},{"title":"Get around the canvas","sidebarTitle":"Canvas basics","icon":"arrows-up-down-left-right","href":"/get-started/canvas-basics"},{"title":"Best Practices","sidebarTitle":"Better inputs","icon":"lightbulb","href":"/best-practices"},{"title":"Core concepts","icon":"book-open","href":"/get-started/core-concepts"},{"title":"Join your workspace","icon":"right-to-bracket","href":"/get-started/join-your-workspace"}]},{"group":"Sketch and render","pages":[{"title":"Turn a sketch into a render","sidebarTitle":"Sketch to render","icon":"pen-nib","href":"/guides/sketch-to-render"},{"title":"Prompting in Modify","sidebarTitle":"Prompting","icon":"comment-dots","href":"/prompting-in-modify"}]},{"group":"Explore","pages":[{"title":"Explore variations of a design","sidebarTitle":"Explore variations","icon":"shuffle","href":"/guides/explore-variations"},{"title":"Match a look with references","sidebarTitle":"Match a look","icon":"images","href":"/guides/references"},{"title":"Change colors and materials","sidebarTitle":"Colors and materials","description":"Explore colorways, batch one colorway per Library color, extract palettes, recolor part by part and make material swatches.","icon":"palette","href":"/guides/colors-and-materials"}]},{"group":"Refine","pages":[{"title":"Edit part of an image","sidebarTitle":"Edit part of an image","icon":"draw-polygon","href":"/guides/edit-part-of-an-image"},{"title":"Show a design in context","sidebarTitle":"Place in context","description":"Put a product on a model with Try on, place it in a scene with Modify or the Smart Dropper, and blend layers with Unify.","icon":"mountain-sun","href":"/guides/place-in-context"}]},{"group":"3D and motion","pages":[{"title":"2D to 3D","sidebarTitle":"2D to 3D","icon":"cube","href":"/2D-to-3D"},{"title":"Extract Parts","sidebarTitle":"Extract parts","icon":"puzzle-piece","href":"/extract-parts"},{"title":"Animate a design","sidebarTitle":"Animate","icon":"film","href":"/guides/animate"}]},{"group":"Deliver","pages":[{"title":"Upscale and export your work","sidebarTitle":"Upscale and export","icon":"file-export","href":"/guides/upscale-and-export"},{"title":"Share and collaborate on files","sidebarTitle":"Collaborate","icon":"share-nodes","href":"/guides/collaborate"},{"title":"Organize your work","sidebarTitle":"Organize your work","icon":"folder-tree","href":"/guides/organize-your-work"}]}]},{"tab":"Tools","icon":"toolbox","pages":[{"title":"Tools","href":"/tools/overview"}]},{"tab":"Workflows","icon":"route","pages":[{"title":"Workflows","href":"/workflows/overview"}]},{"tab":"Reference","icon":"book","pages":[{"title":"Reference","href":"/reference/modes-and-models"}]},{"tab":"Admin \u0026 security","icon":"shield-halved","pages":[{"title":"Admin \u0026 security","href":"/admin/overview"}]},{"tab":"Help","icon":"life-ring","pages":[{"title":"Help","href":"/help/troubleshooting"}]}]},"basePath":"","title":"Edit part of an image - Vizcom Docs","buildId":"dpl_42LwxxU1kGN114H4XzwGYXa9ZDah","deploymentId":"dpl_42LwxxU1kGN114H4XzwGYXa9ZDah","dynamics":["07c022d89b","a74be98ba7"],"chunks":["Frame-5Xwp92K7.js","DynamicMarkdown-BoyYAA8K.js","zoom-image-lightbox-DkE6VzSN.js","lightbox-handle-r17bVUz3.js"]}